Part One: A Visit to the Breaker's YardA bit of back pedaling this time, primarily for Episodes 2 & 3. (You can review the earlier post which better synopses those episodes but it really isn't necessary). Tonight we focus on the
Buzzard, or its demise, as they were all decommissioned in Episode One after the "Icarus Incident". Just to remind you, here is what the
Buzzard looked like, the hero model from "Space: 2019"...
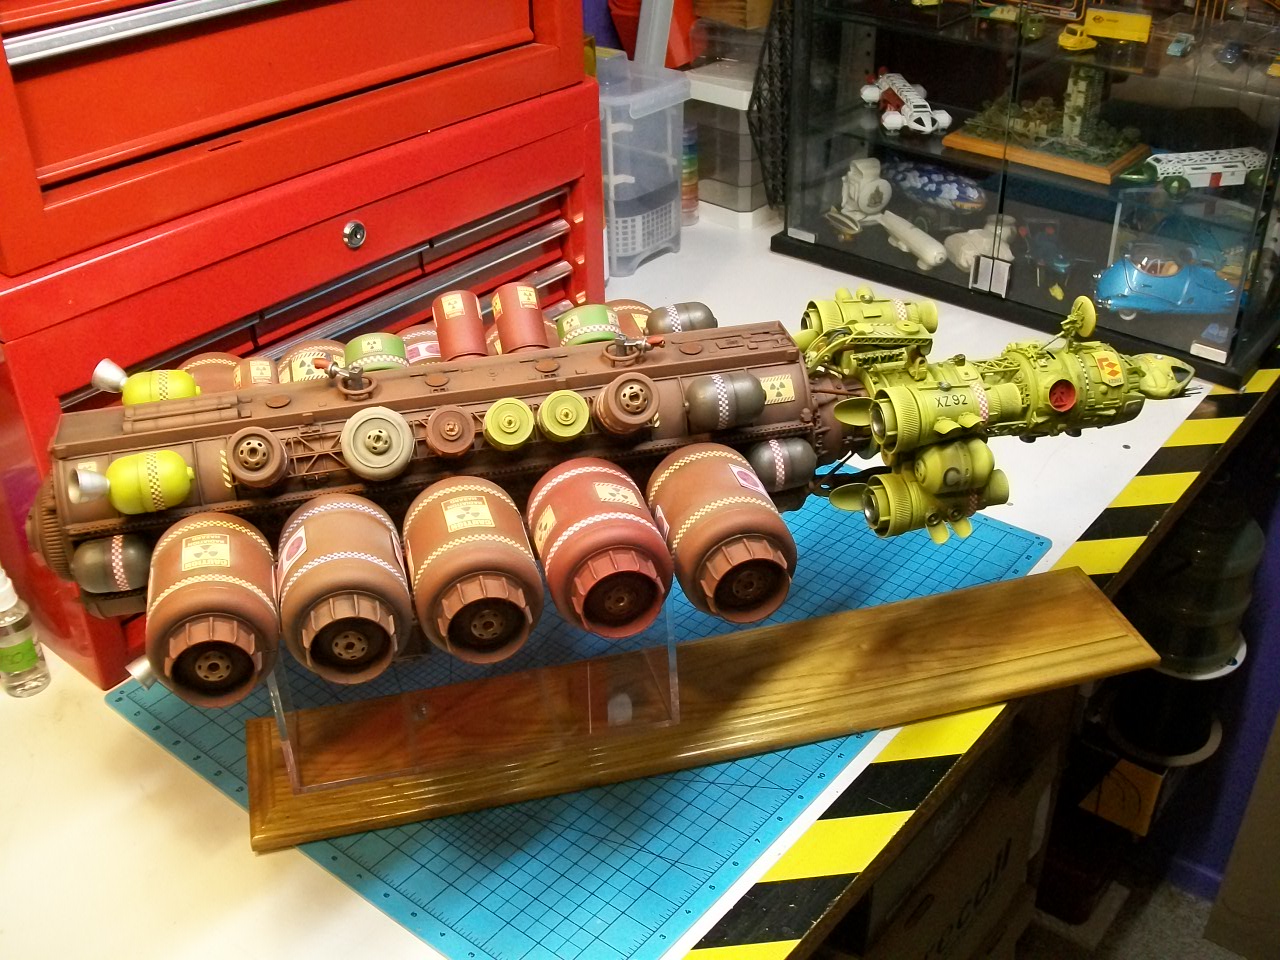
It was OK I guess... But I never felt it was complete or practical, and it now looks unfinished & simplistic next to the PHOENIX. So rather than build a new model, I decided to live up to the name of this blog and do a complete refit/rebuild in 1/96 scale. Nuclear waste was now going to be transported for solar disposal by the Condor, a heavy space tug (which will figure prominently in Season Three, but that's for another post in the future. Before I go into the conversion process, here is the end result....

At least the stand is still original! I began tearing down the model for a few evenings, keeping all the bits for some future project (there were a lot of Kinder Eggs on that hull!). I got rid of the rear drive unit, and replaced it with heavy engines on the main ship. It's actually an idea I had had for some time, as some of you out there may see the influence, the Taiidan Resource Collector from the PC game "Homeworld". Also the story brief called for increased waste capacity, so I added many varied sized cannisters the main cargo unit. A few weeks later, the revised model was in its raw state.

The primary hull is essentially the same with new greeblies added, and an external airlock. I used many of my new favourite greeble. (At recent model show, I acquired a big box of "still in bag" individual tank treads sections, about six varieties. I'll be using these for quite some time...) It was also extended to accommodate the new engines and docking clamps. (That blue bit is actually the neck off a water bottle; nice it had some textures and was the same diameter as the main hull). The two clamps are salvaged from the PHOENIX, as they were left overs from that build. For the drive engines, I had had the idea for quite a bit, the solution being some kiddee binoculars from the good old dollar store. I glued textured lids at each end, plus other boosters, deflectors, more eggs, and greeblies. I also found a solution to add extra cannisters to the cargo hull.

A total of 34 "bottles" of various sizes, meant to convey hurried exporting of waste from several sources. It may be more than just nuclear waste this time. (Further down is a more detailed description of the cannisters...). The ten largest bottles (recycled vitamin bottles) will be attached to those dowel plugs on the side. The other 24 random cannisters (made from assorted plastic containers) are to be secured to the new truss work on the curved portion of the cargo hull. (In the series, these racks are built by the Thule Company of Sweden. As these "roof racks" are now the largest and farthest travelled of any previous roof rack, they are known as the "Ultima Thule". But Easter Eggs aside, it was now Prime Time...


This process took a lot more time than usual; several coats and many rattlers emptied. The spray booth got quite the workout and clogged the filter nicely. I wanted to keep an industrial look to the cargo unit, as it was designed for one way use, so why paint it unnecessarily? But a little colour isn't bad either as I wanted to give it a container ship vibe. I used various shades and brands of red oxide for subtle differences on the cannisters, and some muted colours for the some of the other smaller bottles.
Each cannister has a snap fastener on the lid to indicate a safety valve. That upper ring on the largest cannisters are actually industrial paper towel ends, which I have used many times.
The tug and cargo basic painting is completed, so the next step being graphics and weathering. Some of you out there may be curious about my colour choices, specifically for the Condor. I was going to do the traditional greys or whites as in all space shows, but this being a utility vehicle, I had second thoughts. The key was a few photos of the original Nostromo from "Alien" in the book, "Sir Martin Bower's World of Models". It was a nice yellow-green, and would have been a nice change, but Ridley thought otherwise. Some Sir Chris Foss illustrations helped with the decision too! But before I got to the above, I wanted to tackle the containers.

Doing the weathering and graphics on these 34 parts took the longest. I made up the graphics on the computer and printed them off. Various types of checkerboard stripes and assorted warning labels were then applied, again keeping the cannisters a little more individualistic and varied. Because of the different types of paints used, the water and/or alcohol washes did not work. I had to return to my old fall back of shaved pastels and pigments. The same thing happened on the tug and payload; had to resort to pigments too. (I find it odd that Vallejo washes would not work on Vallejo paints?). Finished off the tug and payload with graphics and did the final assembly.
The tug is secured to the payload by a brass rod, but it is not permanent as they can be separated for photos and future payloads for the Condor to haul about the solar system in Season Three as previously mentioned.
The total model is 33" long (so at 1/96 that translates to 264' or 80m). The width being 14" (112'/34m), and height at 6" (48'/15m). (Problem with these things is where to put them after building; I never learn...). The payload has a separate length of 22" (176'/54m). The independent tug model is 12" long (96'/29m), x 7.5" (60'/18m) x 4.5" (36'/11m) high.
The Condor now has a crew of four, up one from the three of the Buzzards. Three pilots on rotational duty with a "spare" in the boot. All personnel are currently military, armed and trained in space combat. The tug is zero-G, and the round trip from lunar orbit to the drop off point in Mercury orbit is now two months. The ship is also equipped with lasers both on the tug and payload. Taking no chances this time....
The four yellow tanks at the end of the payload are thrusters to send the payload into the sun once the tug disengages from the payload in Mercury (or equal distance) orbit. The same-sized grey tanks are, in fact, nuclear devices (classified, as to why they are not marked as such) in case the payload is threatened, defective, or does not sun dive as planned. Can't let this flying bomb fall into the wrong hands again...
The tug disengages from the payload by releasing the main two clamps and some smaller assorted magnetic clamps. Unfortunately this leaves both ends open. So I constructed two small "plugs" to fill the hole, held in place by friction.
The small booster deflectors on the main engines have an interesting back story. The four larger ones are just spoon ends, but I needed something smaller for the side boosters. The solution presented itself in the cosmetic aisle of the good ole dollar store. A pack of plastic fake finger nails! You get ten in a pack, they are durable and come in 5 sizes. For some reason the wife didn't accompany me to the check out that day...

As you have seen from other posts in this Blog, another one of my hobbies is 00 gauge British trains. I decided to add some elements of that in the scenario of the show/concept. The double red diamond is the graphic for Railfreight Distribution (I couldn't find one for radio active waste...). And in keeping with British tradition, all Condors will have nice shiny nameplates. Although this particular one is C-XV92 (XV being Experimental Vehicle), it will have a proper name. This one is officially known as "The Town of Walsall". (All Condor class tugs are named after cities and towns)
The payload is just basically a cluster of containers around a central tube (which itself is full of radio active rubbish. It is accessed by that big rear door). As I stated, I wanted that container ship feel, and if you are interested, here are the specs of the individual cannisters.
There are currently four types of cannister: A, B, C, and D. Mostly used for radio active waste of various kinds, other harmful elements and chemicals are now being packaged and sent for that one way cruise to the sun. The photo below shows the containers and capacity. (Have I possibly over thought this ..?). Dimensions of individual containers available upon request if you need to get rid of anything...
Oh well, I'll just make sure there are no holes in the plot! If you look closely on the "roof" of the payload, you should be able to make out the two heavy lasers. These remain with the cargo even after the tug has let it fly. Once it is on course for the sun, it will defend against any potential threat. If the lasers don't work, the bombs will! So to all crews out there, make sure you haven't left any of your stuff behind!
So that is the Condor and how it came to be. At least I'll be able to utilize it out for later scenarios when I get around to building new payloads and integrating them into Season Three. (I already have a few made in virtual...). We now move on to Part Two, how and when the Condor was used in the early episodes of "Space: 2022", Season Two!
Part Two: Shorts, Vignettes & Montages
S02-E02 - "Phoenix Ascending"As you may remember, this episode dealt several topics over the three years after the BZ-14 crashed in Northern Minnesota. The aftermath and cleanup of the crash, government edicts, decommissioning the Buzzards, the creation of the Condor fleet, and construction of the PHOENIX. Despite the effort that went into the revised model, it's screen time was minimal with just a brief 30 second shot and voice over narration. (FYI, Brian Blessed did all the narration for this episode as he was at Pinewood doing Episode 04 at the time...). Here, the Condor is on its maiden voyage for the first of many dump runs. The ship is presently passing Venus....
And then as it flies by, we segue into a reverse angle as it approaches Mercury, ready to dump the payload into the Sun. (Ever wonder why when ships traverse the solar system they always pass the planets in order and in a straight line? Just askin'....).
And that was the extent of the models' appearance for this episode. Guess there was only 50 minutes to cover a lot of plot elements and history! The next appearance, albeit brief again, are in the following episode.
S02-E03 - "Journey to Where"
The PHOENIX was the star of this episode, so the Condors input was minimal. Early in Act One, there is an impressive multiple composite effects shot of the PHOENIX being escorted to the launch point by an armada of Eagles, plus a loaded Condor and even an individual tug.
Looks a bit like "Battlestar Galactica", but that show hasn't been made yet! Anyway, that wraps it up for the Condors' involvement in Season Two. You'll just have to wait for Season Three, a limited series just starting production about space truckers called "Cargo: 2023" (formerly "Star Lorries"; that title wouldn't have worked in the States...)
In closing, here is another ego boost shot of me cradling the model, thinking mostly of where am I going to put it after this...
Have a better one!