Sunday, May 4, 2014

Hunter - Prey

The influences for this latest project are probably obvious to most of you.  It did not start out this way though.  I was rummaging through the many boxes of kits with no inspiration or direction and also having several false starts which ended as quickly as they began.  I happened upon a kit from the early '80s from the anime series "Dorvack".  The majority of the models from this series consist of powered armour suits in 1/24 scale, but there are a few in 1/72 scale of the baddies.  I chose the Idelian Cangrid Harbla, a nice little model from Gunze Sangyo.
Once the final choice had been made, the ideas began to formulate.  I had recently seen "Terminator Salvation" so I decided to go this route.  Besides this film, there were of course the other "Terminator" films, as well as the anime series "Gall Force: Earth Chapter", and a short CG film called "Ruin".   It was just modeling after this point.  The Hunter-Killer unit was mostly straight out of the box with some modifications and additions.
I replaced the provided rear domes with boosters, added fins, more electronic eyes, and specific weapons packs.  The right "arm" is a single function blade (for close encounters!), while the left is a multi-gun system with laser, rail gun, missle launchers, and machine gun.  (That array has Zorg Industries written all over it!).  There is also a mini-laser under the "head".
I decided not to do any weathering or battle damage on the "bumble bee" this time around.  I wanted to convey the idea that the machines are winning this one, with new units being constantly constructed out of some exotic alloy.  And even though the H-K has many available weapons, it still prefers a "hands on experience" to dispatch the enemy.  But now it has blood splatter all over it's shiny new talons!
One nice thing about the "Dorvack" kits is the available mobility of the model after construction.  The weapons pods and legs are movable, and since the talon is fixed to the base on a metal rod, it can also rotate around the freedom fighter for different views.
The base was designed to give the opposite effect of the kill-bot.  Some rusty remnants among the rubble, with nature reclaiming the land.  The wreckage are just shapes and screen (the ever present egg...) painted red oxide with various shades of rust effects using dry-brushing and pastels.  The pavement and rubble is just dense blue foam molded and again brushed with various shades of greys.  Then I added various scenery materials for the vegetation.
The two figures are 1/35 Tamiya modified to fit the scene.  Our brave "hero" has decided that discretion is the better part of valour, and when being chased by a flying hunter-killer unit, always remember you don't have to run faster than the robot, just faster than the other guy!

All in all a very enjoyable project.  Simple yet it nicely tells a story of man versus machine, and this time there isn't going to be any time travelling rescue of future leaders.  Just hope for an aluminium shortage!  For the present, just keep your eyes on that Honda robot....


Bonus material available only on this blog.  Special behind-the-scenes photo-shoot of the model with backdrops!

Sunday, March 16, 2014

Get Your @## to MARS!

As all modelers know, even when your deep into a project, there is always something else in the back of your mind.  While building the "Regina", I had many other ideas along the way.  This next model is the result. It has been cobbled together from mostly three main components:  a recycled Dorvack armour, a Sherman tank base, and the housing from a burnt-out Dremel.  All other bits and pieces were scrounged from the parts boxes, plus the inclusion of the traditional Kinder Egg.  After I was finished with the building, here was the result:


It was now time for painting and the inevitable weathering.  As this was a tank on another planet, I decided not to have it built from any iron-based metals.  I figured there would be enough opportunities to use reds for the weathering since it was on Mars anyway.  A basic military green is the base colour, which had steels and metallics dry-brushed on for wear and tear.

The 1/35 figures from Tamiya were modified for the Martian environment (breathers, goggles, etc.).  I had just seen "Iron Sky" so that influenced me considerably!  For the base I used some sands, gravels, and lava rock.  Finally everything was dusted down with various shades of reds and browns to simulate the Martian ecosystem.


The Heavy Tank "Herbert George" is now complete.  I don't have any back-story for the model, but the name itself should conjure up a few ideas...  It's payback time!


Sunday, February 23, 2014

One Big Happy Fleet!

OK, so two ships is hardly a fleet!  But it is a beginning...  Just had to do the obligatory photos of the Regina and Jean together.  Enjoy!

(Next time, tanks on Mars!)


Monday, February 17, 2014

And so it begins....

Today I would like to tell the tale of another "boat"; the Jean was not first.  For this we will go back almost two years, when it all began.  So have a cup of tea, get comfortable, and read on.

Approximately two years ago, I was just finishing up some other model (this is for a later post) and was looking for something different.  I had been in a sort of Gundam phase so it was time for a change.  While surfing the internet, I came across some new artist whose work I hadn't seen before, but took to it very quickly just the same.  His name was Ian McQue, and his depictions of flying boats cobbled together out of spare parts and junk was just the thing.  He was not afraid of colour and there was great composition and perspective not just in his paintings, but also in the many line sketches.  (His work also reminded me of another artist, Chris Foss, whose use of colour and fantastic images I discovered way back in the 1970's during the first Alien film).  The painting which inspired me the most, "Arrival at Sky Harbour", is pictured below...


At this point I began to plan a model (all in my head; I am actually a trained illustrator (before computers),  but have since let my skills lapse in favour of modeling...) and started compiling parts from as many sources as possible.  Plastic shapes, parts from old models and toys, and basically anything which looked appropriate (when painted and weathered of course!).  I had some old vacuum formed shapes which I used for the hull, and then just began layering and building.  Sometimes it would work, other times it was unsuccessful and would have to be removed.  As I mentioned in a previous post, 2D to 3D is not always that easy. Progress was irregular as you can't work on a model all the time.  After several weeks, the result....


But as you will soon see, the final build is quite different.  Again many weeks of cobbling followed until a final concept arrived.  Now things get interesting.  Painting can make or break a model; it can go both ways.  A layer of primer and then it was weeks of trying to find the right mix of colours (especially tones that go well with rust!).  Many pieces were repainted until the desired look.  Then came detailing, distressing, and (my favourite) rusting and weathering.  Many a brush fell during this phase.  I used several types of paint and pastels for the weathering phase.  Nothing was exempt, not even the crew!  To complete the model I wanted it to be doing something, not just floating.  I built a gantry that the ship is moored to.  So let me introduce the Cargo Barge "Regina".


1/35 scale; about 18 inches long, and named after my very understanding and supportive wife.  At least seven months to build, it is actually the largest model I had ever built.  All because I saw an illustration on the internet!  Above is the starboard view; here is the port view...


The barge overhead with the gantry (and worker) in view:


Bow views and stern views:


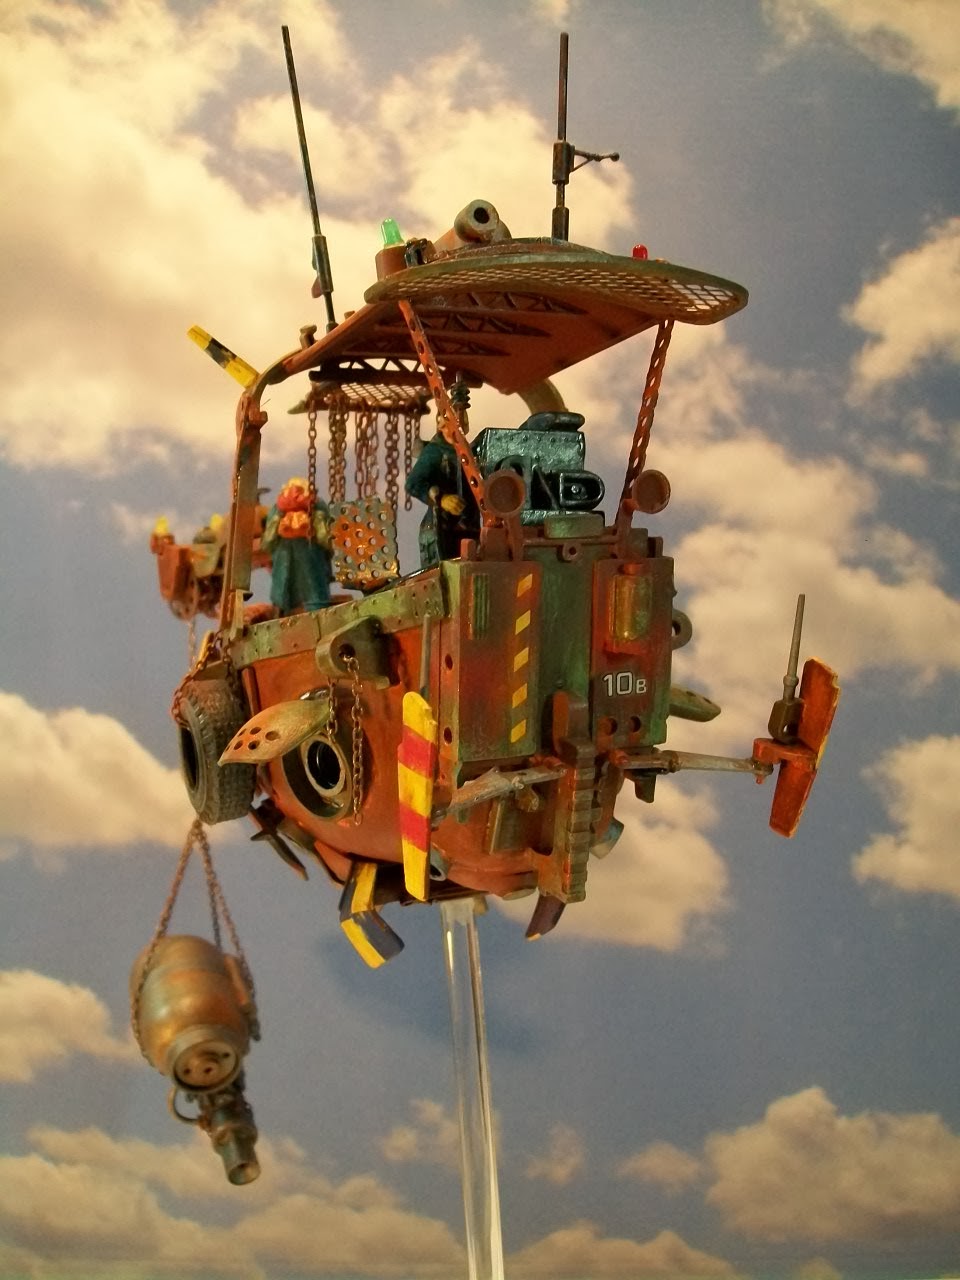
 And of course a beauty shot:


And finally a view of the loaded deck:


But just the boat couldn't be enough.  There had to be  details on the deck to keep interest.  I left the crew and other fixtures like the cargo containers, oil drums, and tarps loose so I could re position them for different looks.  The ship and gantry also pivot around the central acrylic tube for more views.  Again all fixtures are weathered and fit nicely into the "McQue-verse".


All in all, a very satisfying project.  There are many concept artists out there and I challenge you reader, to take the leap yourself.  Find something you like and go for it.  It is very exhilarating to create a unique model from unique art.  Until next time, Bon Voyage!


Tuesday, February 11, 2014

More background for Towboat "Jean"

Just posting a few more views of the model, plus a work in progress shot from earlier in the build.  As you can see, there were changes along the way.  Many times when constructing from 2D concepts, I find the model may look good from one or even several angles, but many times it will fail and re-application of parts is necessary.  Also, an evenings work may look good at the "end of shift", but next day you find yourself asking what were you thinking?

Painting can be a daunting task as this can make or break the model very easily.  I have seen many a perfect model in construction but the paint fails.  For this particular model I used maybe half a dozen brushes in total, albeit they are all ruined now due to the stippling and dry brushing which was used extensively.  Pastels were also used for weathering effects.

Finally, why "The Breakers Yard"?  I never just build out of the box; a kit to me is just a template and not the final result.  I like to scrounge for the right part no matter where it has come from.  In this model alone there are many old kit parts, acrylic and plastic shapes, and the omnipresent Kinder Egg (which has become somewhat of a tradition to include at least one in every model I build).  This will be evident if future posts of new and old projects.


Sunday, February 9, 2014

Welcome to my Blog!

I have finally got this up and running!  Here I will be mostly posting images and the back stories of the science fiction and fantasy models I create.

My inaugural post is the most recent build.  It is the "Towboat JEAN".  The concept is based on the fantastic work of artist Ian Mcque (who you can find in abundance on the web!).  This is a scratch built model in 1/35 scale using parts from whatever and where ever I find them.  Old kit parts, plastic shapes, dollar store finds, etc.  The only actual models used were the Tamiya figures and accessories.

Enjoy and more posts and models are to follow....