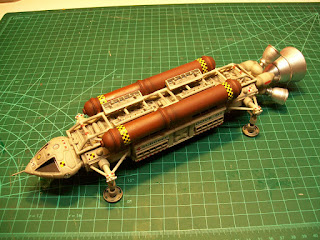
Next in line past Life Support, is Module D, or the Habitat Ring. It is the largest of the modules, most heavily populated, and spins to create gravity. (As I stated in an earlier post, I was never fully accepting of artificial gravity on the Eagles, or any other Earth-based technology ships in both Year 1 and Year 2. I am more accepting on how gravity was dealt with in "2001: A Space Odyssey"). So in this timeline, exposure to artificial gravity and/or magnetic radiation, for any length of time causes brain damage, so now all Earth ships require Grip Shoes, or reasonable facsimiles!
As this module is heavily based on Syd Mead's Leonev from "2010", I had to come up with a logical and, at the same time, cheap method to build it. As Eagles are being slowly phased out to be replaced with the (yet unseen) Doves, I reasoned that Johnson-Bower Aerospace could repurpose Eagle parts for other constructions, this being the case for the Habitat Ring. I acquired one of many 3D Eagle meshes available online and over a few sessions, first in RHINO, then in Solidworks, cut and pasted the basic module into an aesthetically pleasing cluster of five Eagle passenger modules.

I will need two of these, and the prospect in buying 10 original 1/96 Eagles was out of the question, so I had the main unit 3D printed open ended, and would end cap the modules with lazer cut parts. The large open slabs were to be covered by tanks and escape pods. The original doors however, are non-functioning. What followed then were many evenings of applying more lazer cut trusses and shapes plus the usual greeblies.
The detail is difficult to see at this stage; it'll have to wait until its painted. I then moved on to the extra features which were to be applied to the flat, open zones, the Escape Pods and Water Tanks. For the Pods I employed the repurpose method again, this time the landing pods of the Eagles. The shape was good, I had 12 from the three kits, and the Doves do not use them. So I added bits like boosters and such to all 12 pieces.
Only 10 pods were going to be on the Habitat, the other two further along in the Engineering section. Next were the water tanks. For these it was time to use a staple piece in my modeling inventory, the Zaini egg. I required 12 again; it depleted my stock. The seam was covered by a strip of styrene and ends detailed with more snap fastener parts.
With basic habitat parts completed, I needed to create a central core piece. For this I used two old Eagle parts, the small sections before and after the passenger modules. I found two interesting fittings in the big lid box and inserted a brass rod.
The two sections were glued to the core, and then the 12 tanks secured in place. The escape pods were to be a different colour, so they were painted separately. Two nights of IPA wash to do this one; a lot of surface and detail to cover.
That brass rod was temporarily secured to the core for ease of handling; still weighed a bit! Next step was the graphics, the heaviest applications of all the modules. Plus graphic work on the still separate escape pods too!
No shortage of checkerboard, stripes, logos and identification. (See the first post on constructing this model for the original graphic sheets). Logos and signage for Johnson-Bower Aerospace, EUROSEC, and name of the ship. Also ripped that triangular Union Jack from "Alien"!
So that covers the Habitat Ring. I toyed with the idea of somehow motorizing the section so it would spin, but it wasn't worth the time and expenditure. Imagination is a lot cheaper and, besides, it can be positioned in various degrees manually during photo ops. Next time, we head for the garage.


