Introduction & Ramblings
Once upon a time, models were built, simple solitary things displayed on nice little wooden bases, maybe with some rocks or trees or other bits added for effect. This has now become a thing of the past, which can be traced to about 10 years ago starting with "Space: 2019". Simple ideas mutated into conceptual juggernauts, consisting of multiple models, interchangeable pieces & accessories, and back stories and/or episode guides with fake histories. Which is why I can't seem to get anything finished these days! Currently, I am working on several major concepts, all with the parameters as mentioned just now. "Space: 2022" (in the queue are four more remaining guest models and the completion of the Season Two episode guide), "Cargo: 2023" (multiple models and swap pieces with episode guides and back stories; this I blame on 3D printing...), "Space Battleship Yamato III" (mucking about with the current reboot timeline; one model built so far with several more to come), and when taking a break from static kits, working on my 00 gauge model railroad "Rusty Rails". With this death of dioramas, I have replaced them with another term: Playsets. And today's post is no exception, as I have expanded yet again on a previous series started ten years ago. Here now is the current just-completed miniature from that series, with many more already either on the bench, or rattling around in my head:

The first model constructed before this became a series was the NA-HAAG-39 Tortoise, a walking mech from the New Albion United. (Let's just say British to make it easier!). It was posted on April 26, 2015. The second model came 6 years later, posted on March 14, 2021. The Gottesanbeterin was not intended for this series, but after a few meals of large waffles, it became part of the Neuer Deutschland Allianz (you know who!), engaged in a conflict in North Africa circa 2042. (Feel free to look them up if you like). This conflict is based on resources, not politics. This is a world ruled by corporations; there are no more governments. A tired sci-fi trope I know but it works for this scenario. One major change I made though was the date. 2042 seemed too close all of a sudden. The future has caught up a lot faster than expected. Already long gone is the wet & gritty world of Los Angeles in 2019, the clean, optimistic view of 2001, and even the more prophetic green cracker world of 2022. (I'd say the last example is more relevant even now!).
This completed miniature was actually conceived during the construction of the (still in production) model currently on the bench. I reasoned I would need a supply pipeline to ship cargo across the desert to various locations. So with both my interest in trains and cargo in general, the Heavy Cargo Crawler Schnecke was born. Before we get started, (and there is a lot of ground to cover in this novel, so you may want to get yourself a coffee...), here is an image of the full model with just one of a multitude of potential cargo and wagon configurations:
Schnecke und Nacktschnecke
Might be hard to see, but that is 30 inches of desert train. Scale is 1/220. (I chose this scale because its the same scale for that primary model I mentioned still under construction). There are two main units for this train. The Schnecke (snail), which is basically a locomotive, and the Nacktschnecke (slug), which are the wagons. The concept has a lot of "Thunderbirds" and other Anderson shows influence. (You can just about hear the Barry Gray music as it trundles across the landscape).
The Schnecke (which here on in will be called the S-Unit in order to save time, and wagons the N-Units) is 170mm x 42mm x 25mm. Which at full scale would/will be 37.5m x 9m x 5.5m. It consists of a dual quad-track drive unit which are steerable. It has a cockpit which can accommodate three crew at a time, a crane with magnetic plate, a cargo area which is also a magnetic plate, and an atomic fusion motor slung under the frame. Port side has an access hatch for personnel, and on the starboard side:
is the exhaust pipe array. There is also a coupling unit at the stern, various radar units, crew cabins, and rolled tarpaulins here and there. The N-Unit is similar but lacks all the luxury items.
Basically a powered flatbed which is un-manned (although there is a control cabin in the belly of the beast if needed). Two couplings, tarps of course, a larger (magnetic) cargo area, and those teeth-like blocks on the flatbed are for cargo securement. Slugs are controlled from the main cockpit on the S-Unit, but they don't have to be linked to be maneuvered. So now that you know the back story, I will tell you how I built these four little bastards!
Since this model was to be a train of sorts, just no tracks, I rummaged around and found these two old flatbeds I had from a charity shop purchase many years ago. Now discontinued, these were Tyco/Mantua HO flatbeds. They have some very unique features which made them different from other brands. (I knew they were old as they had the place of manufacture as Hong Kong!). Initially, I was only going to make the S-Unit and one N-Unit, but as stated earlier, I lost control and purchased two more wagons whilst attending a recent train show/sale.
I began by dismantling the wagons, discarding the bogies & couplings, and grinding down the ridges down the centre. Mounting sleeves were drilled in for the quad-tracks, and the open area of the bed replaced with some textured styrene. The engine room was made from a truck petrol tank from the greeblie box cut in half; it was enough for both wagons. The tie downs were made from those many tank tread pieces (which are now starting to diminish), and then a few more details added here and there.
The S-Unit section was more complex. The cockpit was made from a small helicopter kit (I wanted a retro-future/Heinkel He 111 look to it). Other greeblies added around this feature from various sources and a few small guns. The crane was cobbled from various cheap dollar store vehicles; at least it moves! That was the easy bit; I still had to make the treads....
I wasn't about to go out a purchase 8 tank kits, model or toy. So obviously the Anycubic X6Ks was drafted into action. Then a few hours of virtual rummaging over at Thingiverse! I found some suitable files, scaled them, and printed off 8 pairs of treads. I combined the treads into a cluster of four, and installed a peg on the top. The result was this:
The initial two units were already completed when I decided to make two more. I had only the one petrol tank so I had to print one from a similar 3D file. Had to print off 16 more tread sections too. Unfortunately, I did not keep a photo record of the build after priming.
For the base colour, I used my new favourite Vallejo spray Dunkelgelb Panzer Yellow, which I have used several times previously. Other sections were painted a lighter version of the same colour. The tank treads were dark grey then dry brushed with steel to simulate wear. Paint chipping was done with the sponge method, added some decals, and then the model was lightly washed.
As this was supposed to be future tech, I was trying to avoid iron based elements. But securing the loads is done with magnetism, so iron slabs it is! Dry brush several tones of rust, and then bordering the area with some left over graphics. Couplings are made using some greeblies, stock styrene and combining them with existing German HO couplings. They were weathered and still work, attached with a small screw so they can turn on the flatbed as required. At the end, everything was dusted down with yellow-brown pigments. But only one N-Unit type? Not bloody likely....
Every train has a caboose, or similar end of train device or feature. The
Pellbock unit can be removed using the same mounting system as the couplings, or left in place. The primary slab was made by combining two landing pads from the standard Eagle model kit. The rest of the bits are the usual assortment of greeblies. Finished it with painting it the lighter yellow-green, washed & weathered, graphics added, then dusted.
You may notice that all the units have rolled tarps/stowage randomly placed on the wagons. Of course you need protective covering for cargo. There are several methods I could have used to make these tarps (3D print, model kit accessories, molded putty, tin foil, or tissue paper soaked in PVA glue). I chose a method (I believe was unique), by using latex gloves. Since I use a lot of them for painting and cleaning resin parts, there was an endless supply, as they don't have to be perfectly clean.
I start by cutting off the finger section and making a small puncture in the tip. I then roll the strip from the cut end using a piece of sprue, which in these examples are 1" long. Once fully rolled I tie the roll with very fine floral craft wire. Coat of primer and then dry brushing base and highlights. I don't think this method would work for tarps much bigger than these (although I will try someday), or as flat sheets. I then glued them to the wagons. Try it yourself! Rolled tarps from latex gloves!
Heavy Cargo
So now we have a locomotive and three wagons. But if this model train is to have any lasting play value, we are going to need loads and stuff to haul around, which is a good segue to this next section. Now would be a good time to refill that coffee! Firstly, here is an assortment of pics with various cargo configurations:
There are of course many more possibilities, but we don't have time for that. In the inventory of available cargo, there are three types of containers to start; the Type 1 (large), the Type 2 (medium), and the Type 3 (liquid). Here is where the 3D printer came in real handy!
I had actually created these for one of my other series "Star Lorries". They fit very nicely in the wagons, so I started printing them off in large quantities.
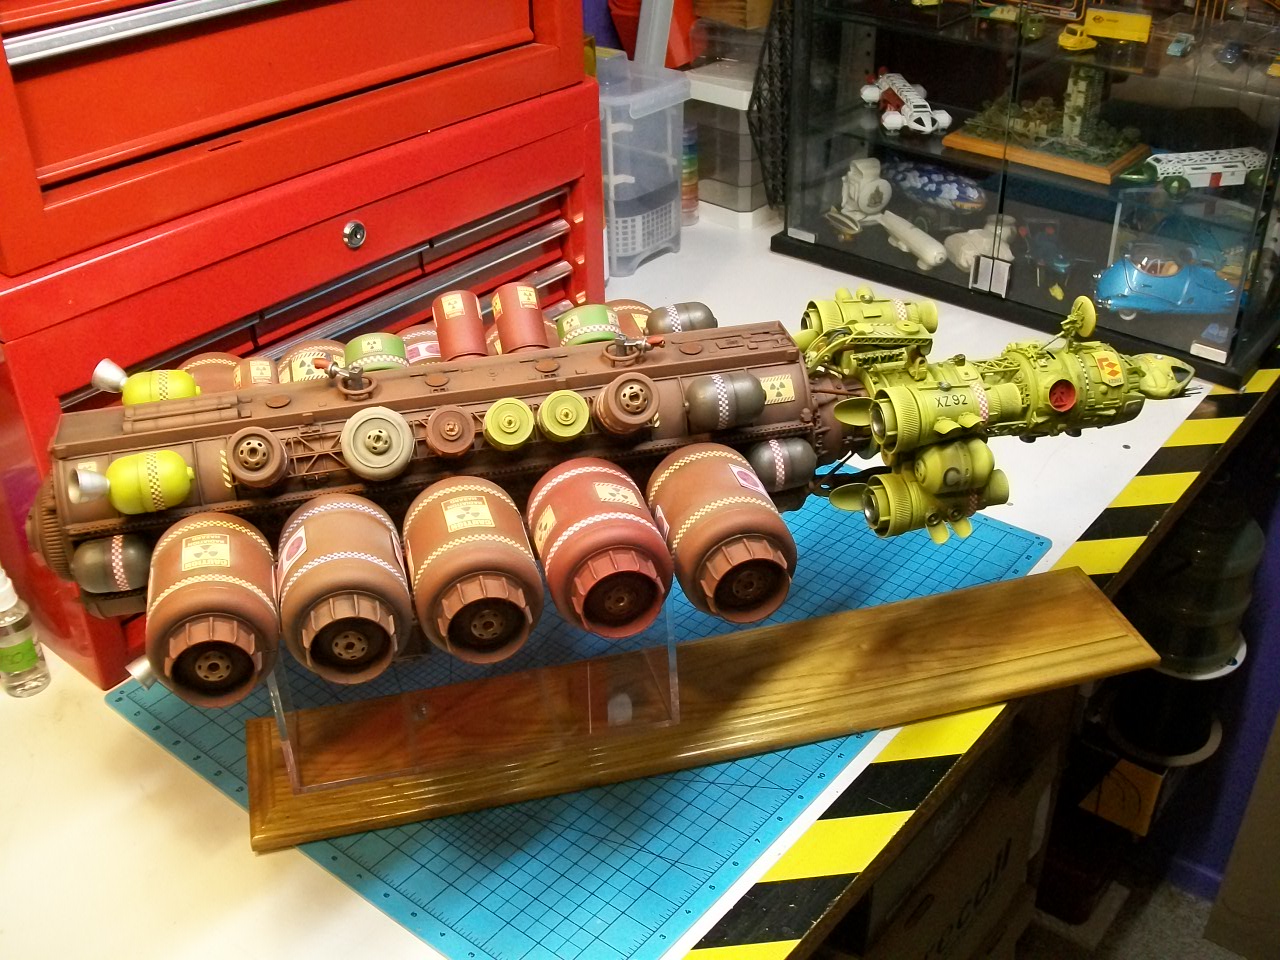
In the end I had printed 24 Type 1, 4 Type 2, and 5 Type 3. (There is also a special T1 variant which I will discuss later). I primed them first in red oxide and then a thin coat of water based hairspray. Final coat with various greens and subtle military colours. I used a wire brush with a bit of water to scuff them up and do some subtle exposure of the undercoat. Some graphics and then sponge painting various shades of rust. Lastly a coating of dust. The containers are rusty due to an outer veneer of iron needed for the magnetic loading system. It also looks better too!

They work best when stacked two high, but three up for special occasions, which refers to the special one I mentioned earlier. A vehicle this large is of course very vulnerable to attack, so in most instances the train will go out with various armed escorts (still in early phases on the bench). But it doesn't hurt to keep something up your sleeve just in case. So I came with the Springteufel, basically a very nasty jack-in-the-box!
Surprise! I adapted a nice AA gun/missile pod I found on Thingiverse. The special (yellow green) containers are mounted on the top of the stack, and when some baddie flies in too close, who's laughing now?
You may have noticed something else in the last pic. Can't just be hauling containers around; we need some variety. Using the same basic file for making the Type 3, I scaled it up and made it much longer. Added some greeblies to the resin part, primed, and then the usual format. I now have a nice tank full of atomic fuel!
These final loads justify the reason tarps are hanging off the wagons. I made two full tarps; one for the S-Unit and the other for an N-Unit. Nothing fancy, just a cover for a standard 10 crate load.
These I made using aluminium foil, as it conforms nicely in the right places. I made a block of foam using the dimensions of a standard load, over which I carefully folded the foil (using a makeshift break out of rulers), and then added some subtle folds and creases. Primed, painted and some dry brushing for highlights. Dusted lastly of course. Also added a chain around the load to keep the tarp down. Rather than cover the detailed containers with these tarps, I instead made another block of foam for it to sit on, and then painted it dark green.
Even at this point I still had several more ideas for other loads. But I held myself back as there were other models to build. And now, here are some nice staged beauty shots taken by NAU spies lurking about in the rocks and bushes:
"Looks like we stumbled on a delivery...."
"Those aren't fly swatters..."
That completes the report on the Schnecke. It's now safely tucked away in (one of many) display cases. At last count, I still have at least 7 more planned models for this series. Fortunately I am keeping everything at 1/220 in order to save space. Next year I plan on doing up a photo novel with all the models; I have a few stories in mind. Anyway, thanks for sticking around.
Have a better one!