Part One: Obligatory Back Story
Two months ago, I retired. Which is both exciting and terrifying at the same time. Gone now is the steady pay cheque, employee benefits, job perks, and the social interaction with my former colleagues. (At least the pension cheques are coming...). But after fifty years in the work force, (26 years here; all other employers went out of business...), finally all the free time to do the myriad of things I have been trying to catch up on for many years! Modelling of course, being the main one among others. And by some strange coincidence, my coworkers must have known this. So on my final day, unbeknownst to me, they had arranged a special surprise. And all I asked for was a triple chocolate scone...
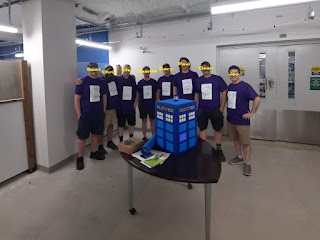
Escorted to the ceremony, with my sister MJ on my arm, I was serenated with XTC's "Making Plans for Nigel", and was surprised to find a large crowd had gathered around a central table bearing gifts. And many had dressed specially for the occasion in custom purple T-shirts with a special crest, of which I will explain.
(The above doodle was done some twenty years previous, and for whatever bizarre reason was fished out of the bin and has haunted me ever since. And it was only a preliminary sketch...) On the central table was a good luck card signed by many, a farewell poster (which unfortunately I can't show for confidentiality reasons), the afore mentioned scones, and a Tardis (?). (The chaps in the back, my purple army, have had their identities preserved to protect them from things like creditors, ex-girlfriends, etc). It is true about the Tardis, it is larger on the inside, as it was actually elaborate gift wrapping. I didn't want to open the box without some surgical tools in order to preserve the work that had gone into it, but I was given a photo of the contents inside. And as the title of the blog hints, it was an AnyCubic X6Ks! I was gobsmacked! I certainly was not expecting this; that's what I call a whip round!
It was then followed by a few hours of surreal good byes and hand shakes. I would like to thank everyone involved for this special send off; I hope I haven't forgotten anyone... (If I do, please accept my apologies and/or email me and I'll edit this post and get your name up!) Best wishes to a grand bunch of talented people doing a unique and stressful job! (we build engineering models by the way, but can't tell you where...). So big good byes to Chris (whom I'm sure it was his idea for the printer!), Jerry, Joe, Dean, Cory, MJ, Sean V, Sean M, Paul, Marina, Josh, Drake, Anthony, Isaac, Harrison, Bryden, Jake, Erin H, Gary, Quinton, Charlene, another Erin, Ian, Mike, Bryce, Patrick, Curtis, Jordan, Tom, and last but definitely not least, Ryan!
Part Two: Unboxing, Lots of You Tube, & Amazon!
Now don't get me wrong. I have dealt with 3D printed models for many years at work, first with resin SLA and in the last few years, filament printers. But as a traditional modeler who originally worked from rolled up blueprints (Google it...), and built these models using raw materials by hand, it was akin to the individuals who made miniatures and practical effects for film, to be replaced by CGI. I felt it was cheating and making soul less models, but at the end of the day, but it was business. (So stop your whining; adapt or die). I had also been using AutoCAD, Solidworks, SketchUp and Rhino to "construct" these models for close to twenty years; but it was business. (So stop your whining...). Besides, when I got home, my styrene kits were waiting for me.
Even though I had been drawing up and using these printed models at work, I had never actually set up a machine. (That was for the elite to ensure consistent operations). So for the next two weeks I researched on good ole You Tube among others, and learned all the nuances of 3D resin printing. I cleared a spot in my already crowded workshop, constructed a firm platform, and surgically removed the printer from that special gift wrapped Tardis box.
(Hey look, the walls are purple!). Printer is all calibrated and ready to go, but there is something missing. Can't print anything without the goo, so ordered some resin from Amazon. Also had to consider washing and curing the parts, but as luck would have it, the Anycubic "Wash & Cure 3" was on deal that week. Another box on the front porch and more shelf space needed on the bench.
Cleaned out the local Walmart of 91% IPA, and resin was poured into the printer hopper. But what to print for the first run? If the previous posts of this Blog is any indication, it's a no brainer. Off to Thingiverse for the Space: 1999 Eagle models! (Among many other files...)
Part Three: The First Born
I decided to stick with the same scale as the "Space: 2022" models I have been building, and proceeded to make a fully printed Eagle (using the files from the Zarkus_Model_Kits Eagle) at 1/96. What follows is the succession of parts and procedures, from slicing to final cured parts.


