Saturday, May 2, 2020

I hate you, McQue....

Once upon a time, (modelling) life was simple.  I was content to build kits and scratch build from various Gerry Anderson series, assorted Sci-Fi television and movies, and Japanese anime mechs from the 80's & 90's.  And then it happened; I stumbled across a posting in "Concept Ships" featuring  the work of artist Ian McQue.  His colour palate and subjects of flying junk boats traversing through the air, defying gravity on some future/past Earth or other planet was inspiring!  This was 10 years ago, and from then on he has lived in my head rent free.  Since that time I have built two flying ships (see previous posts of the Cargo Barge Regina & Towboat Jean), and all the time the urge to build more as always been there.  So in the hope that if I built one more boat, I could get back to "normal" modelling.  Unfortunately, this did not work.  And the project got out of control.  What was to be one little ship mushroomed into a diorama of sorts comprising of five ships, plus a central structure to tie them all together.  The result, The Tofu Tower!


The Tofu Tower is a run down, grotty little anchorage off of the main shipping routes.  Ships and sailors who frequent this establishment want to avoid inspections and other authorities.  Here they can replenish themselves with food, water, fuel, repairs, and most important, companionship!  There is also a restaurant, a taxi service, and with all the comings and goings, an RNLI station.


For this project, I decided to change the scale so I could build bigger, but take up less space in the display cabinet.  (That is always the problem with modelling; where to put them afterwards...).  The previous ships were built at 1/35, but this time I chose 1/148, which was British N scale.  The tower is 24" high, which is almost 300 feet high in "reality".  The five ships range in size from 2" to 8".  Three are fixed/moored to the tower.


I didn't want the display to be fixed, so I came up with the idea of having movable components.  Using a steel base, I fixed magnets to the underside of the tower and aluminium plates for the two ships which allow to put them anywhere I want.  Unfortunately the acrylic rods holding up the ships are permanent, but this gives the height variation as well.  I lost track of how many months I worked on this.  It must be at least 9 months, as I only get 1 to 2 hours at most in an evening to model.  Now here are some nice close up blue sky shots!


This low angle view shows some of the many billboards, a few condenser units, and to the right, the taxi.   Here we see the most popular establishment on the tower, as well as the roof gardens.  It was all so rusty and bleak out there....


Much more of the tower, it's features, elements and construction will be discussed and described in the next post.  And the assorted ships will be done in good time as well.  But it's getting late so last call and lights out, sailors!


Sunday, November 24, 2019

My First Commisson

For this project I would be stepping out of my comfort zone.  My Father-In-Law, who from here on in shall be referred to "Mr. H", asked me to help him with one of his models.  Brief back story: Mr.H models the Deutsche Bundensbahn  in HO scale (1:87) and his long time layout fills most of the basement.  A huge layout with much interest which can keep five operators busy for hours!  So when he wanted to renovate an older area on the layout with a new industry, he asked me to paint the model for him.  The industry decided upon was a Cement Factory, so he purchased the "Old Time Cement Plant" kit from Faller.  That was the easy part.


There were several parameters to keep in mind for this "commission", and a few difficulties to overcome.  The first being that, in all my years of modelling, I had never built or painted a structure.  Sure, lots of spacecraft, armour and sci fi mechs, but no buildings.  The second was that the model had already been assembled, so I had to work around that as best I could.  The most important element I had to deal with was that Mr. H is not as big a fan of weathering and rust as I am, so I had to dial it back but make the model look "lived in", as an industry such as this could not be totally clean!


The first thing I proceeded to do was spend many hours researching painting techniques for the various materials on this structure, which were many.  The building has masonry, steel, wood, and other metals.  I had to consider what the time period for this was as well.  What did we do before YouTube!  


So there was the final product, after many hours of painting, dry brushing, washes and pastels.  For the stonework I started with a basic grey, and then painted individual stones in other tones of grey and some brown.  This was followed by a dark wash to bring out the mortar.  There was also some dry brushing and pastels used for accenting and highlights.


There was lots of wood in the structure.  Wooden doors and the main building itself.  For that I used a dark brown base and then dry brushed on various shades of brown and tan, also doing some areas lighter and some other planks darker.  For some variety I thought the doors should be a different colour so I used various shades of green over a dark brown base.  Again just a slight hint of weathering and use of time, but no peeling paint or alligator textures.


The roof appeared to be made from metal sheets, so based on the period, I imagined them as being made from copper.  I used a base coat of a few shades of copper, and then dry brushed on an emerald green acrylic to simulate the patina effect.  


The rest of industry is steel or ironwork.  I painted those in various shades of steels, and used dry brushing of silver and aluminium to highlight the edges.  Since all the walkways were steel, and we can assume these areas would be well traveled, I dry brushed and powdered various shades of rust for the wear and tare.  There are other metal details such as piping and light shades, which I used some bronze and other light metallics.  What remained now were the silos.


Those I painted various light greys, again avoiding too much distressing by just lightly using dry brush and powders to bring out the details.  For the corporate identity, text, and colours on the silo, I referred to some cement/silo wagons Mr. H already had on the layout.  I took a photo of the wagon and made the signage in Photoshop.  


The final effect I wanted to add was some greenery around the foundation, so I did some subtle mossy green wash and fine flocking.  I thought it needed something a little dramatic, so I "grew" a vine to frame the main doors.  This vine was achieved using some coarse lichen and flocking.  I think it is one of my favourite features of this project!


So that was my contract completed.  I learned many new techniques and found I was able to keep the weathering demon under control.  It is now up to Mr. H to install this building on the layout.  Happy to say he was very pleased with the results, and here is the satisfied customer to prove it!


And my commission?  Coffee, cake and unlimited operating time!   Now for some "Where's Waldo".  Here is a long shot of the main section of the layout.  See if you can find that building...


Next time, back to the Atlantic Ocean!


Sunday, July 14, 2019

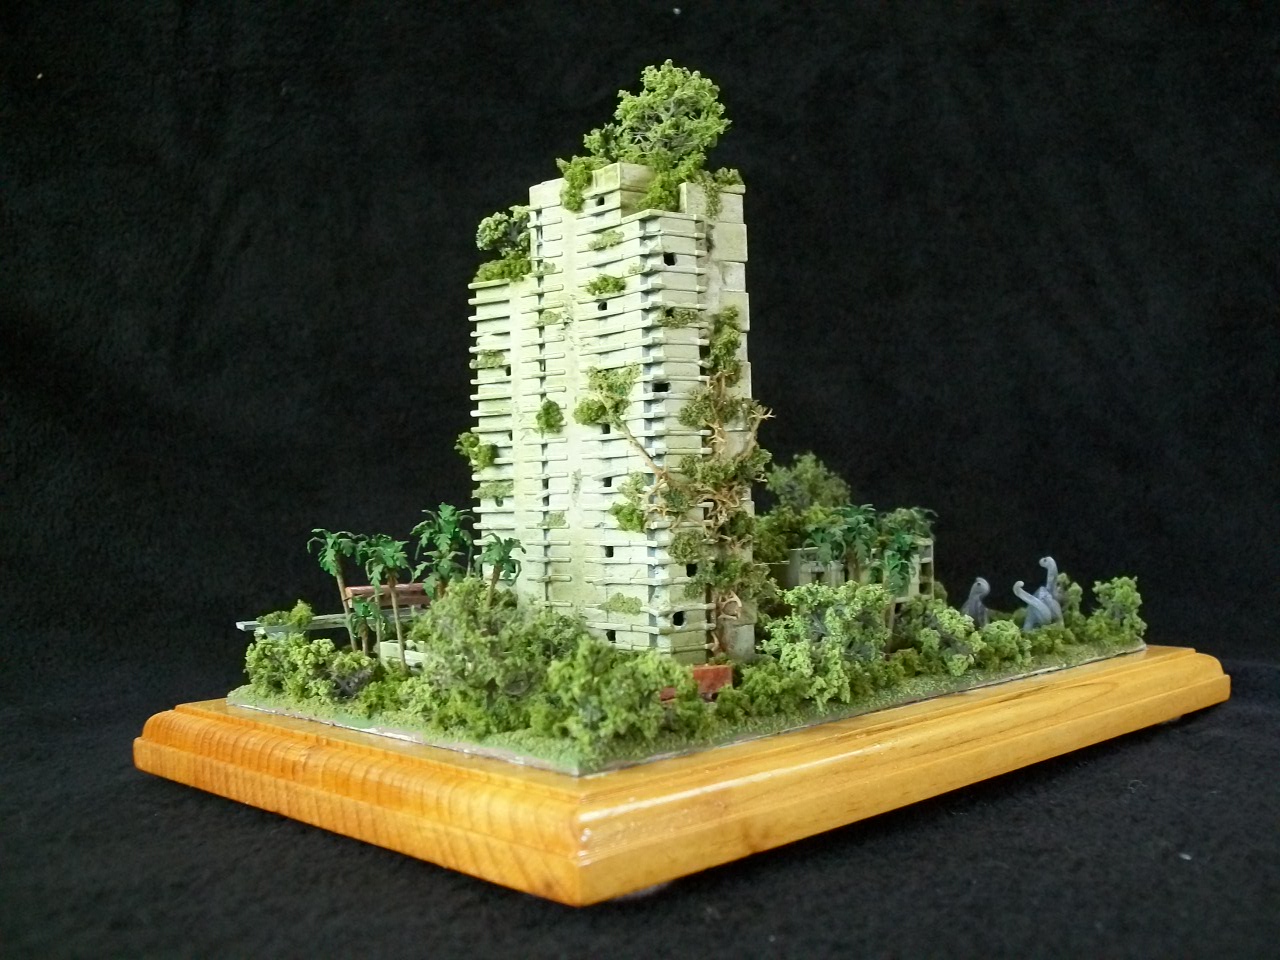
Jurassic Condos


Time to take a break from the ocean crossing...  Been trying to get a model done for almost two years now.  Success, but only a small one...

As you holder's of Pinterest accounts will know, you get a barrage of emails on a regular basis with such titles as "We think you might like these pins" or "We found some boards we think might be right up your alley", to name a few.  One time it actually came true, as some images of model buildings all done up nice and post-apocalyptic with nature taking back.  Some are even semi-submerged with aquatic creatures suspended in the translucent resin.  "Hell, I can do that." I said to myself.  Intrigued, I hunted down the modeler's website, and eventually found the blog "Kinagawa Masaki's Model".  Check it out if you want to see more of his work.

Long time followers of this blog know I do engineering modeling by day.  Not just computer but good old hands on crafting.  Scale models are required for the building performances and sciences, and are usually created in Stereo Lithography machines from computer files.  In some cases after the completion of the project, the client will request small models for their personal use.  These "mini-models" as we call them are integrated onto a base with the names of the building and our firm, and are grown at 1:1000 scale.  Luckily about the same time I found that website, a spare mini model from an old job was going begging.  (Thnx Jake!)


This was supposed to be a condominium in Florida, but sadly it was never built.  The dimensions are 4" x 7" on the base, with the tower being only 4" high.  (I have blanked out the various names and organizations involved for obvious reasons).  It was glued to a wooden base and modeling began.  At this scale my eyesight was going to get a workout!


I started by adding a road out of stock styrene and then distressed it using a rotary tool.  I also carved out chunks and cracks in the cladding and drilled out holes to indicate broken windows.  I then "excavated" two areas for water features.  The largest was to be a sinkhole which would account for the collapsed section of the parking structure.  I used slabs of styrene plus gravel and some screen to simulate the rebar.  On the other side I decided to put in the Metrorail line, even though technically it wasn't there in "real life".  But neither was the condo.  All the other exposed ground was then covered in fine sand, and then the model primed.


Lots of painting followed with various brands in both enamels and acrylics.  The ponds were painted dark green for depth while the condo was painted in several subtle shades of greys and buffs.  Of course you can't have a road or monorail without vehicles, so taxing my eyesight further I made some trains, cars, and a few semis in 1:1000 out of styrene.


Not very big are they?  After painting I used a very fine black marker to represent windows.  They were then attached to the base erratically to await the final weathering.  But before this it was many nights of flocking and "planting" trees.  Eventually, the finished product...


Much of the model is now covered in various textures and density of green, but before I started the process I did a wash of Vallejo medium slime over the whole building. Grass and shrubs are mostly coarse flocking and foam, while the larger trees are "recycled" trees from work which can no longer be used for tests.  I scrounge for everything!


Several groves of palm trees are included (I tried to keep them to scale), and also "planted" some large vines growing up the sides of the tower.  There are some other vines but are hard to see due to the other greenery.  Rogue gardens are also sprouting from various balconies.


The mechanical units on the roof got a dose of rust as did all the vehicles and rebar.  Couldn't have that monorail intact.  Got that inspiration from all those nights roaming the "Capitol Wasteland"!


I think "Logan's Run" was the first time I remember (perhaps first time in the cinema?) to feature the Green Apocalypse scenario.  All those beautiful Matthew Yuricich matte paintings. Quite commonplace now especially with games like "The Last of Us" and the real life location of Pripyat.


For additional interest I decided to add a dose of "Simon Stalenhag".  Needed something in that sinkhole.  Originally I was going to put in alligators but at that scale they would have been fairly small, so a larger beast was chosen.


I used Woodland Scenics Realistic Water for the ponds.  As the main sinkhole was supposed to be deeper, I filled it in with the resin while the Brontosaurus was in the middle.  I found these little guys in a hobby shop, which then helped to create the title for the project.  Guess someone at that safari park left the gate open...


From these two views you can see the "finished" cars and truck.  I decided to use only one semi to keep the road less crowded.  Makes it more unique too.  And here again is a shot to remind you just how small this miniature is...


This took about a month to do.  Mostly an hour every evening when possible and hoping it would rain on weekends!  In closing here are some more blue sky shots.


 Next time, "pre apocalypse" modeling!

Wednesday, September 26, 2018

The Voyage of the Spammed - Part 4: "There's no spam...?!"

Welcome back to the middle of the Atlantic Ocean, readers.  Tonight we have a look at the culinary choices offered during the voyage; Breakfast, Luncheon, and Dinner.  Plus a few extras as well.

The few menus Mum managed to save were from the latter part of the journey.  That I believe was due to the lack of any food remaining in our collective stomachs for the first three days at sea, as was mentioned last post.  But we are hungry now so let's start with breakfast!

The only breakfast menu here (as was all the menus) were on heavy card stock, all printed in Britain.  The offers for the first meal of the day for June 7, 1964, was on this 7" x 11" card.  Also, all menus had a colour illustration of a mode of transportation, plus the Canadian Pacific logo as well.


Some unusual items here....  Never heard of Sauerkraut juice, but apparently it is good for digestion; probiotics and all that stuff.    Plus I had never heard of Charquican Chileno.  It is an Argentine beef stew topped with an egg.  No Weetabix, and without spam, no chance for a Sunday fry-up!  But it is only a few hours to lunch...

The menus for lunch and dinner are now folded cards, with outer cover again with an illustration and logo on the back.  The flat card is 9" x 6"


But what's for lunch, Mum...?


More heavy eating by the looks of it.  I guess the idea was to fill us up so we would nap for most of the voyage!  A big breakfast and now a big lunch.  Maybe dinner will be a little less food....

The dinner menus, folded, were 10" x 7".  Mum saved three in total.  Here is the menu card for June 7, 1964.


Another meat heavy offering, and that Turtle Soup?  That is disgusting!  I just hope I had salad and ice cream!  The menu for June 8:


Fancy chicken soup.  I'll have spuds and beans please.  Back then I don't know how much flexibility there was with the choices.  We didn't have peanut allergies back then, or never heard of gluten-free or vegan.  Basically growing up, it was eat what was put in front of you, or you're getting it for breakfast.  I am sure this philosophy was not suspended for "eating out".

Of course no sea voyage is not complete without the Captain's Gala, when everyone wore their finest clothes they had for the trip and had a formal dinner.  This took place on Saturday evening, June 6, 1964.  I am almost certain us kiddies did not attend this event.  We were probably left in the cabin with a bag of crisps.

The Gala menu card was the largest, 10.5" x 8".  Not a transportation lesson this time but a Medieval theme depicting much gluttony.


Same offerings, just with a fancy type face.  I never did find out if you could get seconds....

Now let us examine the scenario.  Mum and Dad travelling across the Atlantic for 7 to 8 days, berthed with three kids, ages 3, 5 and 9.  And not much to do...  Yes I would like a drink!

The Bar Price List was the most worn and used menu in the collection.  Folded in half, I believe they must have carried it around for the duration of the trip.  I don't blame them; I'd be spending a lot of time at the bar too!

This 8" x 7" card had the same painting of the "Empress" as the Passenger List booklet did; slightly larger.  The back of the card was the price list.


Not only drinks, but you could also get smokes.  I identified a total of four bars on the ship.  Everything on this list is extra; no alcohol was included in any of the meals.  It took a bit of detective work to figure out the price list.  It is in UK currency before decimalization; Pounds, Shillings, and Pence.


So for example say you wanted Gin.  That shot would cost you  One Shilling (s.) and Sixpence (d.).  Which translates to our present (Canadian) as roughly $2.25.  Not much at first but don't get carried away buying rounds for the officers!

So no one is going to go hungry.  This trip will not degrade into a "cannibal cruise"!.  I am sure there were other places to get snacks at the shop, and off hours at the clubs and lounges.  But I doubt they would have served an unattended 5 year old !

So can I be excused from the table, Mum?  I'd like to go play games on my phone...  Not bloody likely!  This is 1964!  So what does one do in these no internet, no Wi-Fi dark times?  Find out in Part Five of the voyage!


Sunday, September 16, 2018

The Voyage of the Spammed - Part 3: "A 162 Hour Tour"

So the ship had left Liverpool at approximately 6:30 pm on Tuesday, June 2, 1964.  First a quick stop in Greenock and then out to the Atlantic.  The family has been berthed in a starboard cabin, M115, on the main deck.  It's a window seat!  But more accurately it has a porthole, so we get to see the water and waves splashing at us all during the voyage.

Location of the cabin is shown in this snip from a JPEG of the deck plans.  (I was trying not to use any outside source material for the series, but Mum and Dad never had any plans.  So I gleaned the plans from "The University of British Columbia" online library.  If you would like to see the full image, you will find it here.  Have a look around; there is a lot more to see there!

(https://open.library.ubc.ca/collections/chung/chungosgr/items/1.0216080)


The cabin had a wash basin, toilet, shower, dressing table, a main berth and a double bunk.  Here's your young author getting ready for the night, whilst older sister "A" gets in some mirror time; she'll be getting the top bunk of course.  The porthole is just to the right of the dressing table, and younger sister "M" is the lucky one to get the crib.


Apparently the family spent the first three days in the cabin for the most part.  Once we got past Northern Ireland, we were met with Beaufort scale 6 conditions; strong breeze, large waves, and white foam crests.  No one was going anywhere or eating much.  Most of the ship was down with sea sickness so it was rather quiet.  There will be more on the weather conditions in a future post.

So finally the sea (and tummies!) have calmed.  We are fit for touring the boat, so here is the family all nice a fresh.  That's me on the left in short trousers.  Mum is in the middle with sister "M" and sister "A" is on the right.  All pretty in pink!


Here's Mum near the deck tennis courts on the Sun Deck, the topmost deck of the ship for public access.  Looking forward you can see the rear left side of the funnel and just the edge of the checkers.


One level down is the Sports Deck.  Here is an aft view with Mum and the 3 kiddie winkies.


The Sports Deck is also where you would board the lifeboats.  This is a view from the starboard side.  There were only 12 lifeboats; 4 were larger with canopies, as can be seen here.  With 105 First Class passengers, 877 Tourist Class, and 487 staff and officers (including the dancers...) for a total of 1469 souls on board, would there have been enough room?  Woman and children first!  Sorry Dad....


Next level down was the Promenade Deck.  Another aft view of just the edge of the deck.  Yep, England is far behind us now!


Based on the calmness of the sea, I suspect these photos were taken well past the point of no return and we very close to Newfoundland or even already past entering the St. Lawrence River.

Surprisingly no photos were taken inside the ship, and the few I have here all taken in what seems to be the same day.  But there was more to do than walk the decks and keep an eye out for icebergs.  Next time we will discover what was on the menu to keep us all fed, when we could keep it down that is!