Tuesday, July 2, 2024

Space: 2022 - Building the PHOENIX - Part Three

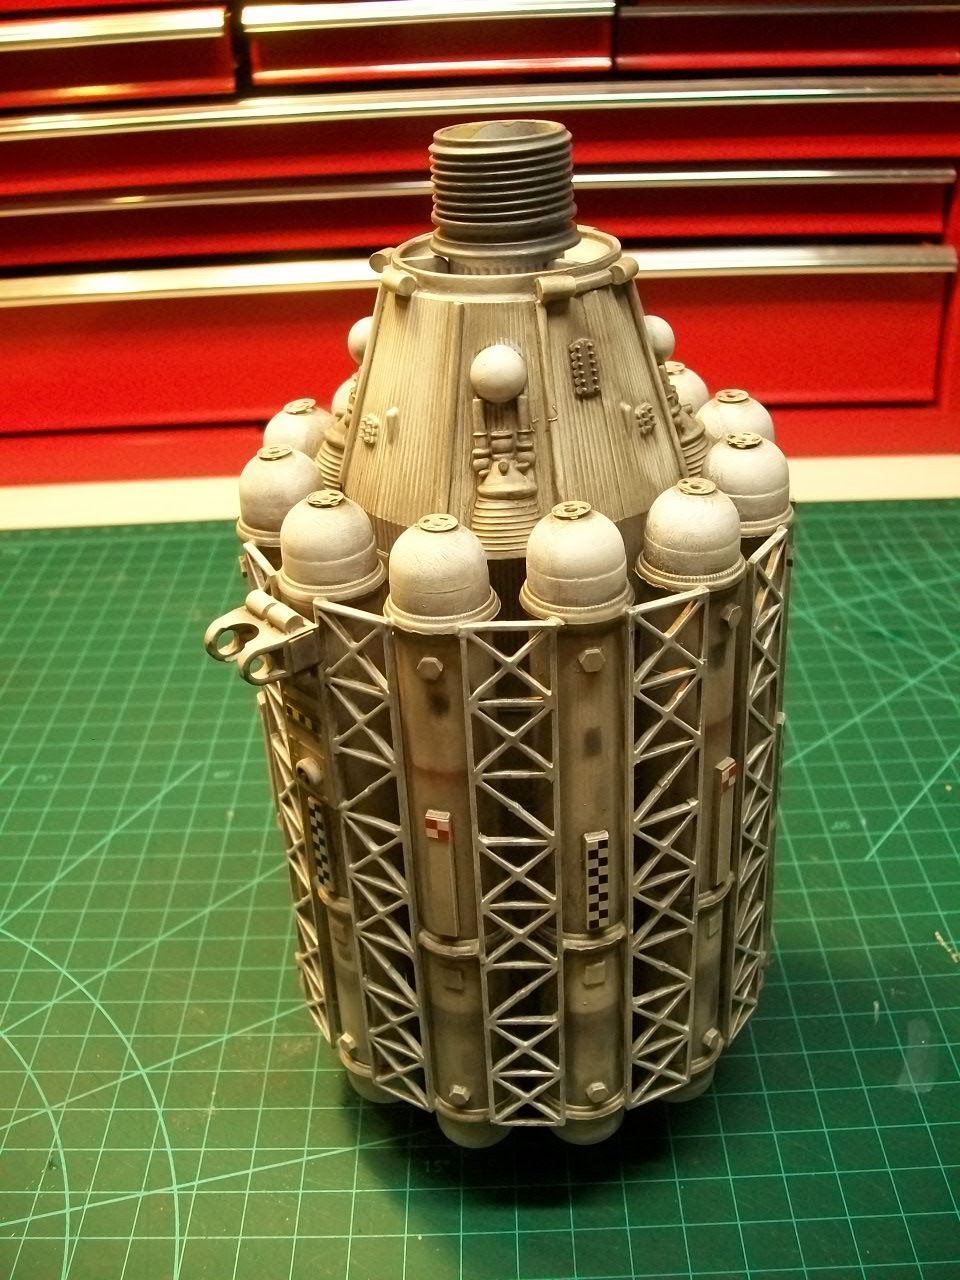
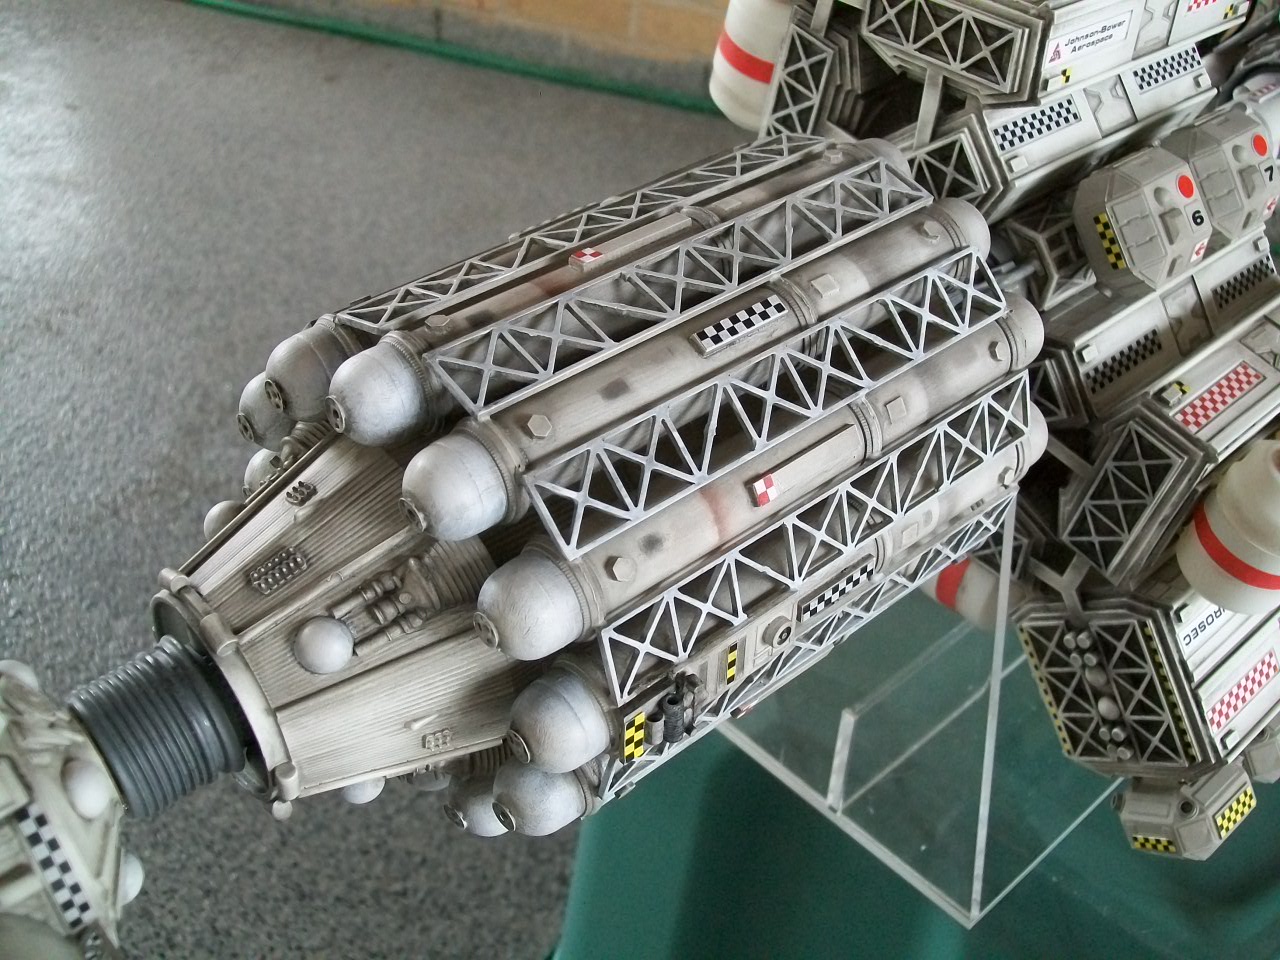
Next in line past Life Support, is Module D, or the Habitat Ring.  It is the largest of the modules, most heavily populated, and spins to create gravity.  (As I stated in an earlier post, I was never fully accepting of artificial gravity on the Eagles, or any other Earth-based technology ships in both Year 1 and Year 2.  I am more accepting on how gravity was dealt with in "2001: A Space Odyssey").  So in this timeline, exposure to artificial gravity and/or magnetic radiation, for any length of time causes brain damage, so now all Earth ships require Grip Shoes, or reasonable facsimiles!  

As this module is heavily based on Syd Mead's Leonev from "2010", I had to come up with a logical and, at the same time, cheap method to build it.  As Eagles are being slowly phased out to be replaced with the (yet unseen) Doves, I reasoned that Johnson-Bower Aerospace could repurpose Eagle parts for other constructions, this being the case for the Habitat Ring.  I acquired one of many 3D Eagle meshes available online and over a few sessions, first in RHINO, then in Solidworks, cut and pasted the basic module into an aesthetically pleasing cluster of five Eagle passenger modules.  


I will need two of these, and the prospect in buying 10 original 1/96 Eagles was out of the question, so I had the main unit 3D printed open ended, and would end cap the modules with lazer cut parts.  The large open slabs were to be covered by tanks and escape pods.  The original doors however, are non-functioning.  What followed then were many evenings of applying more lazer cut trusses and shapes plus the usual greeblies.  


The detail is difficult to see at this stage; it'll have to wait until its painted.  I then moved on to the extra features which were to be applied to the flat, open zones, the Escape Pods and Water Tanks.  For the Pods I employed the repurpose method again, this time the landing pods of the Eagles.  The shape was good, I had 12 from the three kits, and the Doves do not use them.  So I added bits like boosters and such to all 12 pieces.

Only 10 pods were going to be on the Habitat, the other two further along in the Engineering section.  Next were the water tanks.  For these it was time to use a staple piece in my modeling inventory, the Zaini egg.  I required 12 again; it depleted my stock.  The seam was covered by a strip of styrene and ends detailed with more snap fastener parts.


With basic habitat parts completed, I needed to create a central core piece.  For this I used two old Eagle parts, the small sections before and after the passenger modules.  I found two interesting fittings in the big lid box and inserted a brass rod.


The two sections were glued to the core, and then the 12 tanks secured in place.  The escape pods were to be a different colour, so they were painted separately.  Two nights of IPA wash to do this one; a lot of surface and detail to cover.  


That brass rod was temporarily secured to the core for ease of handling; still weighed a bit!  Next step was the graphics, the heaviest applications of all the modules.  Plus graphic work on the still separate escape pods too!


No shortage of checkerboard, stripes, logos and identification.  (See the first post on constructing this model for the original graphic sheets).  Logos and signage for Johnson-Bower Aerospace, EUROSEC, and name of the ship.  Also ripped that triangular Union Jack from "Alien"!


So that covers the Habitat Ring.  I toyed with the idea of somehow motorizing the section so it would spin, but it wasn't worth the time and expenditure.  Imagination is a lot cheaper and, besides, it can be positioned in various degrees manually during photo ops.  Next time, we head for the garage.


Tuesday, June 25, 2024

Space: 2022 - Building the PHOENIX - Part Two

 Tonight's spotlight is on Module C, the Primary Life Support Unit.  This was actually the first piece I started when the project began, and obviously, the most heavily influenced by the "Ultra Probe".  The base was the first section of the Airfix Saturn V model used, parts for Stage 2.  It was constructed as per the instructions, but then everything changed after that!

I then added two cylindrical fittings at each end to support the internal hollow brass rod.  The one at the front is a hose fitting from some Gardenia product (don't tell the wife...), and the one at the end a cap from the big box of lids; it's a banker's box full folks!  The most distinct feature on this module is of course the array of tubular tanks.  Whereas Sir Martin's Ultra Probe had six, I have doubled that to twelve.

The tanks are actually acrylic tubes liberated from the good ole dollar store, which were sold as containers for Jello shots.  They came in a pack of six and I cleaned off the shelf.  Unfortunately I have not seen them since.  As they are open at one end, I capped them with appropriate sized googly eyes, which I usually acquire at craft and sewing stores.  I had to create a jig so I could place the tubes accurately at every thirty degrees; I had made a special mounting part to help with this. The silver rings are actually rings, another dollar store find.  Used apparently for Stag & Doe parties as mock wedding rings.


The tubes are linked by surplus laser cut Perspex, and the smaller domes and tanks are those plastic fake pearls from the "you guessed it!"  Then obligatory greeblies, other parts from the Saturn V, and small plastic shapes, which are actually negative pieces (cast offs) from laser cutting.  Never throw anything out!


The metal rings on the end of the tanks are parts of snap fasteners, another acquisition from the sewing store.  They come in many sizes, and are good for varied uses, but not as intended on my workbench of course!  Building completed, it was prime time.  As stated in the previous post, every part primed at the same time, and the failed water based weathering attempt.  IPA and acrylic wash on this bit too.  Took an evening to get the shading right.


With various shades of pigments, I used templates to create seams and shading on the tubes and some paneling.  Much less graphics on this part too; just some checkerboards.  


Grey for the end caps and some red oxide thrown in for good measure.  You may notice two brackets on two of the tubes.  These were intended to hold solar panels which would fold away when the ship was in warp and then deploy horizontally.  Something similar to the "Meta Probe" or "Altares".  


I built them from the solar panels in the Laser Battle Stations kit as a base and then glued on prismatic sheets from the crafting aisle.  I did not like the result, as it made the ship look awkward and ruin the lines, so I omitted them and just replaced the brackets with some greeblies.  Here are the panels by the way...


So that wraps up Module C!  Next time, Module D, the Habitat Ring.  The largest, heaviest, and my favourite part!


Sunday, June 16, 2024

Space: 2022 - Building the PHOENIX - Part One

 This model/concept never had a direction.  It just "became" as I progressed with ideas and influences from several sources.  There were no preliminary sketches, just a vague design mostly based on the Ultra Probe from the "Dragon's Domain" episode in Yr 1.   When it became the PHOENIX from "Doppelganger" I have no idea.  Here is the original:


Typical 60's spacecraft design.  Textures, boosters, and sensor equipment.  Also carries another ship in the "boot", but that is for another post.  I intended to use this colour scheme, as you can probably see from the shots of the "studio scale" model.


But you can't build anything without raw materials.  Although this ship is loaded with greeblies, nurnies, 3D printed and laser cut parts, and of course treasures from the ever giving dollar store, it still needs a base.  For that I turned to these three basic kits for most of the primary parts:


I'd had that Airfix Apollo 1/144 kit kicking around for 40+ years!  Of course had to utilize the (original) Eagle 1 model; there were actually three used.  None new, mostly second hand or previously built kits, but salvageable none the less.  The last kit was an obscure Revell kit of two Laser Battle Stations from 1984.  It was never re-released.

It made sense to use the Airfix Apollo kit as it was exploited so many other times by Sir Martin for his "1999"  models, and by others from various Anderson series.  A few examples are the space dock from "Breakaway", derelict ships in "Dragon's Domain", and used as parts for many Alpha buildings, the Mark IV Hawks, and so on and so on...  Since my plan was to make this ship modular, it worked out nicely to use individual stages of the rocket.  

Each module has a brass tube insert, and for final assembly the pieces are stacked horizontally in a logical and aesthetically pleasing order.  (I have yet to mix the modules to make alternate versions of the ship, perhaps at a later date).  Also easier to handle and work with smaller parts, and not wrestling with four feet of plastic!  So we will (finally!) begin with Module A, Command and Control.  And since Module B, The Hub, is physically connected, we'll break that one down too! It begins with a purpose built 3D printed part I adapted from one of the many 3D Eagle models available online.


Module B's base is more recent, the ESA Lab payload from the Revell 1/72 shuttle kit.  The connection was almost too perfect, like it was meant to be.  It was then many evenings of finding the parts, and applying them.  

Lots of tank parts and some surplus laser cut stock.  The airlock tubes are made from acrylic storage tubes with a screw on top.  I just reversed the cap and put in a laser cut door.  Those tanks are actually plastic baby bottles for baby showers, hexagonal shaped with added plastic pearls (see Shape Spotting #4).  The "Nostromo" probes are just various guns from other armour kits.


The final piece of the The Hub was the main antennae.  Cobbled together from whatever, but the main dish was from the original Slave One kit.  


It was then prime time.  Unfortunately I did not take any pictures of the early paintings.  Remember I was building other modules alternately.  It depended on my mood as to which one I worked on.  But everything was primed at the same time.  For the base colour I used Krylon white primer.

This is the finished Module A/B with accents, weathering/dirtying down, and graphics, with obvious nods to the original Phoenix scheme.  It wasn't a model shop; it was an assembly line.  The initial weathering was a failure.  I had all parts ready to go and was going to use an acrylic wash of watered-down black, saturating with a sprayer and then removing paint accordingly.  I had watched several You-Tube videos on this.  But for some reason the paint did not like getting wet.  It would not adhere and repel the wash, like water on a waxed car.  Wasted a lot of black acrylic.  Frustration set in so I abandoned the ship for a while and went on to another project.  (See "Rusty Rails"...)


When I was ready to start up again I researched some other wash techniques and decided to try a 50/50 mix of IPA and acrylic black.  I started by saturating the model with pure IPA and then spraying/brushing on the wash.  The results were much better although it took many hours of fine tuning the wash.  I strongly recommend doing this in a well ventilated room, outside or with an extractor fan, and with latex gloves.  I also used pigments and pastels to better increase the detail definition.  


Command module was painted yellow, and the airlock doors red.  End of airlock tubes painted a medium grey.  The graphics I created myself.  Using AutoCAD of all things, I produced and series of checkerboard and hazard stripes, as well as various emblems and type.  I printed on matte photo paper rather than decal paper; more durable and forgiving and there is no glossy finish.  By mistake I printed one in BxW; used these more than the colour sheets!


The grapplers on the main airlock was a last minute concept.  I had already built the grapplers for another part of the ship, and had some spares.  Needed something for the ship to hang on with, as in docking with space stations or other ships.


To get the nice crisp border around the viewports, I used .02" x .02" strip styrene with an absolute minimum of glue.  Those were the basic steps and procedures for the construction of the model.  Next time we'll break down Module C - Primary Life Support, where I have exhausted my acrylic tube supply!


Saturday, May 25, 2024

Space: 2022 - Year Two is Here!

 The year is 2022.  The 111 men and woman on board the ESE "Phoenix" embark on the greatest adventure mankind has ever known!  But an encounter with a proton storm hurls the ship into the far reaches of the universe.  Will the crew be able to survive the dangers of being lost in space...? 


It's been a hard journey to get here, but thanks to the perseverance of the fan's letter writing campaign, the show will go on, although with some changes; a lot of changes!  The suits in the American office decided the show should not become too restricted to the local solar system, instead to change the format to a space exploration show, like that other one with the pointed-ears guy, where the (mostly the same as Year 1) cast will visit strange alien planets and civilizations.  And of course monsters!  We want a monster every week!  That's what the people asked for, and that's what they'll get for the next 24 episodes.  

I came up with the second season premise primarily basing it on "Space: 1999"s year two.  Love it or hate it, or you can meet in the middle. There is a lot of debate over the second season, too much for me to want to discuss at this time.  I also decided to throw in elements from other sci-fi series, and their respective year two's (or three's even...).  Into the Vitamix went bits from "Buck Rogers", "Lost in Space", and the Anderson feature film "Doppelganger" ("Journey to the Far Side of the Sun").   A pinch here and a dash there also from other obscure series, which will become more apparent as the story progresses.  

Yes, this is blasphemy, and I know I will end up in Anderson Hell with the likes of The Hood, Captain Black, and Agent X20!  But this is a spoof, and a love letter, so don't take it too seriously....

So obviously for the series we will need a ship.  I had a vague concept in mind and over the period of many months, (even years thanks to some delays and diversions), and inspiration from Sir Martin Bower's work on 1999,  (yes, I knighted him!  It's not just about the actors...), created the ESE Phoenix.  


Built by Johnson-Bower Aerospace in Lunar orbit for the European Space Exploration Center, the ship is 122 meters long (400 feet) and can fold space using a new propulsion system, but only in short bursts of 42 minutes maximum.  More on the "science" later.  Of course this being an Anderson production, we need an acronym:

P - Prototype
H - Hyperdrive
O - Outer
E - Exploration
N - Neutron
I  - Injected
X - Experimental

This "studio scale" model, built at 1/96 scale, is the smaller of the two filming miniatures.  It is used for long and medium shots.  It is 51" long from command module to main motor, and is composed of seven distinct purpose-built sections.  


Module A
Command and Control.  All the piloting and ship operations are done from here.  Personnel are pilot, co-pilot, science, navigation, communications, and weapons.  


Module B
The Hub.  Here are other operations of the ship including security, computer, and reception.  This module also has two minor airlocks and the main airlock (with grappling arms).  Opposite from the this is the large antenna array.  


Module C
Primary life support.  Everything to keep the ship's personnel alive and healthy.  Atmosphere processors and scrubbers, water filtration, hydroponics, and recycling.  Probably the most important section of the ship.


Module D
The Habitat Ring.  It rotates at 1G (except during warp when it is locked down).  Here are crew quarters, mess, medical bay, labs which require gravity, and common areas. There are also more external tanks for air and water, and since this is the section where most off duty personnel will be, 10 escape pods, which can hold 5 people each.

I decided to eliminate the idea of artificial gravity; it was too convenient.  So I defaulted to spin gravity, the excuse being long term exposure to magnetic fields (gravity generators), causes brain damage. Of course this means there is no gravity in the rest of the ship.  (Might make some of the scenes difficult to film, so we'll try to have people in chairs or standing holding handrails most of the time to keep the wire stunts to a minimum!) 


Module E
This is the garage of the ship.  It's for the two secondary spacecraft that dock here, and support such as maintenance & repair.  An airlock on each side and magnetic grapplers to hold the ships.  Eagles are being phased out in favour of these new prototype ships, called "Doves", which we will visit in a later post.  


Module F
Main Engineering.  Support for the ship in general, but mostly for monitoring the main motor and secondary drives.  This module also has the two escape pods.


Module G
The final section is the main and secondary drives.  The primary is a Mark VII Queller Drive.  As mentioned it can fold space for short periods of time.  But now it is much safer after all the issues with the Voyager probe ships.  All the previous problems with the drive; the fast neutrons, the sound and pulsating distortions, have been rectified.  But just to be safe there is a heavy shield between F and G.

The secondary drive are standard fusion drives, adapted and updated from the original Eagle design, but more powerful.


 That's the basics of the Phoenix.  I consider this a "bastard from outer space", the love child of the Leonev from "2010", and the Ultra Probe from the episode "Dragon's Domain".  Here are some more images of the miniature.  


Next post I'll break down the model to the individual modules and how I built this monstrosity.  It's nice to build models like this, but the problem at the end of it all is where to put it!


Wednesday, July 19, 2023

Space: 2022 - The Future is Fantastic!

 It took some time (7 years to be exact), but we finally have a second season for "Space: 2019"!  Not to go into too many details of the series at this time; just posting a teaser of the "studio scale" model of the Phoenix...  


At 51" long, this is the largest model I have ever built.  An explorer ship loosely based on "Space: 1999", but taking place in an "Alternate Anderson" universe as with the previous fake series.  It has taken a long time to complete; think I started it before Covid.  The basic problem with this model is getting some decent photos taken.  I need to build a special rig for the photo shoot.  Then I can do official posts for construction, series & episode guides, plus many other special features.  

So stay tuned.  Maybe have it ready for the new Fall line up!

Wednesday, March 8, 2023

Happy Birthday, DAD!

Taking a break from the regular model posts today to acknowledge my late father's "what would have been" his 91st Birthday today.  Unfortunately, as some of you regulars may have seen in some other personal posts, he past away November 28, 2014 after a cruel battle with Alzheimer's.  But it's all about the journey, right?

Son, Husband, Father, Grand Father, Gentlemen, Tradesman; he was not your typical "kick the football around" guy, rather than one who taught skills and encouraged excellence in more practical applications.  So he never watched me in the big game, rather he introduced me to carpentry, model building, literature, and personal growth & responsibility.  Now is just a brief synopsis of his life; there is much to show and tell.  So please, read on...

Malcolm Victor Rostance was born March 8, 1932 to Percy and Lilian Rostance in the West Midlands Market Town of Walsall.  The youngest of three, he had an older brother and middle sister.  Much of his earlier years I remember little unfortunately, but it sounds like the life of a typical boy.  He even admitted to me he had been a train spotter!  As his father was ex cavalry from WW1, the military was always predominant and discipline was the way of life.  Despite Walsall being probably one of the furthest areas away from the ocean, Dad preferred the Royal Navy.  He joined the local cadets, T.S. Walshale (an older word for Walsall).  Here he is in 1947, 15 years old, ready to hit the high seas!


He was also a member of the band, and played the snare drum very well.  I remember he wanted to join the Navy but his father would not allow it; he would have needed his permission at the time.  After regular school, he entered an apprenticeship to learn trim carpentry and cabinet making.  I believe before this commitment he would have done woodwork in school as well as model building as he had stated, but models were quite different back then.  Apparently a "kit" was some blocks of wood (probably balsa), plans and some sandpaper.  

His apprenticeship lasted I believe about three years up to around his early twenties.  He became a master carpenter and had a license to drive.  Of course at this time Selective Service was mandatory, and he was called up.  This is sometime in the early '50s now.  Dates are hard to come across these days; alot of the ink on the paperwork has faded...  Hoping for an "official" stint in the Navy he got disappointed again.  Because of his talent with woodwork, he was drafted into the RAF for his skills.  First he was off to RAF Padgate for basic training.  Here is Dad with the other lads.


That's him on the lower left.  About 10 weeks I reckon from what he told me, and then a posting to RAF Anglesey, in Wales.  Apparently pilots were training in the early jet fighters for the Korean War, but Dad was staying on the ground, fixing the airframes; some wood and some metal.  He worked primarily on Gloster Meteors and de Havilland Vampires.  He had said when he signed off the aircraft was air worthy, you better be sure, as he was taken up to "inspect" his work.  You learn fast to do a good job!  Here is one the families "iconic" images of Dad at work sitting in the cockpit of a Vampire:


He started as an Aircraftman, but upon his discharge about two years later, he was a Senior Aircraftman.  One thing he always did was commit fully to his job.  During his time in the RAF, he had married in 1953, but now in civilian life, he went off on a total different direction and began to manage a Wine Store.  (This was previously visited in the "Voyage of the Spammed" series, so I won't go into that tonight).  Many years and three kids later, it was off to Canada in 1964.  There is so much more to tell and show; perhaps I should write a book some day...

Once settled in Canada, my Father worked three jobs to keep us all comfortable; he would never had asked for charity.  Carpentry being the obvious choice; he had employment already arranged before he even arrived!  He even dabbled in furniture sales and part time construction.  In only a few years he was with the company building the new Conestoga College in Doon.  It's opening day in 1967 and Dad has dressed for the occasion!


I think that tool pouch is still around somewhere...  After the primary construction was concluded, Dad was offered to stay on as a permanent carpenter with the College.  Eventually his talents and dedication was noticed and he was offered the position of "Manger of Physical Plant".  He took it.  Dad supervised all the tradesmen, security, daily operations, grounds, etc., etc.  It was a 24/7 job, and was always on call.  And he was called many times in the day and night and weekends and holidays.  Here he is "relaxing" at his desk sometime in the mid seventies.


Sparsely decorated and functional.  He didn't spend too much time in there anyway.  And in case you are wondering, that black thing on the right is a telephone.  But don't be afraid, its push button!  Because of his job I missed alot of him during those years, but he always made time for me when he could and when it was important.  He also gave me a good hiding when I deserved it!  I actually saw more of him when I attended the College in the late '70s, since I was always working long hours to finish projects.

But all through his extended work hours he still found time for his family, as well as his hobbies and interests.  I don't know how he did it.  Making furniture, renovations, building a massive deck around our new pool, the list goes on.  He eventually started his last great hobby, R/C boats.  Not sure what and which bug bit him, but he started his first around the late '70s.  Guess this was his ticket to get back to the Navy!  He was a scratch builder; no kits here!  He would meticulously research each project, in so far as to acquire blueprints and historical information.  He could talk your ear off if you asked a question about the subject boat or ship!  All in all he built only five models over the years, but again it was because he was a master craftsman and modeler, no shortcuts!  Two of the boats he had given away at some point (I still have lots of pics!), but I have the last surviving three.  I hope to do a much more in depth retrospective one of these days.  But in the meantime, here is his final ship, the HMS Ark Royal at 1/160 (It's about four feet long):


 Remember too that these were not static models, they were fully operable in the water.  (I hope I can get them seaworthy again!).  He would attend many model "regattas" and take home the odd plaque or trophy.  There is so much more to tell; so much more to show.  It is not easy to distill a man's life in just a few pages, especially when that man has done so much, and inspired & touched so many!  Perhaps another blog series anyone?

In closing, I will leave you with this image of my father at his final regatta.  This was around 2010 and the Alzheimer's was starting to show just how much of a bastard this disease can be!  Two years later he had to be put in a care facility; not a very dignified or honourable ending for a man of his talents and dedication!  And yes, even after almost nine years since his death, I am still really pissed off!


The boat on the right is a Vosper MTB at about 1/35 scale.  This was his first boat.  The other red and white is a Canadian Great Lakes Coast Guard vessel, at about 1/20 scale.  Again, researched, scratch built, and operable.  

Thank you for spending this time with me, and getting to know the man who was my Father.  Albeit only a brief visit.  I like to believe and hope I am a lot like him in so many ways, and carry on his values, beliefs, and many talents.

Happy Birthday, Dad!  Taken from us too soon.  We all love you and miss you!