Friday, May 5, 2017

Gunpla - Kobayashi Style


I have been a big fan of Anime for many years, first being introduced in the '70s to a show called "Star Blazers".  Since then its been pretty much out of control, with acquiring many kits from dozens of series.  The franchise know as "Mobile Suit Gundam" began way back in 1979, and still continues today.  Luckily Bandai has no problem with churning out plastic model kits of the many machine variations, so Gunpla (Gundam Plastic) was born.

In the early 80's I became aware of an artist, Makoto Kobayashi.  Not only a manga artist, he is also a master modeler, concept artist, and mechanical designer.  His distinctive style is easily recognizable, most notably in his distorted and bloated mechs.  His work can be seen in many series.  The Marasai, Bound-Doc and The-O in "Z Gundam", his own "Dragon's Heaven", machines in "Venus Wars", and "Last Exiles" to name only a few.  His many models have been seen in "Hobby Japan" magazine, as well as individual publications such as the "Hyper-Weapon" series and "AS Wars".  Rather than do a full bio I encourage you to pursue his work further; there are ample sources all over the internet.

So with Kobayashi on my mind, I looked for a suitable kit to convert and settled on a mobile suit from the 1989 OVA Gundam "War in the Pocket", the MS-18E Kampfer.  Actually a spacey mech, I decided to make it more down to Earth and put it in a desert environment.  So then it was many nights of scrounging for the perfect shapes, and altering the model accordingly.  I wanted this to be a walking battleship of the desert.  Eventually this evolved...


The finishing began with a basic coat of khaki from the Krylon Camo line.  A nice series of paint which dry quickly.  So far it has not harmed any of the plastic I have used and you can paint over it with both acrylics and enamels from several sources.  Thus was created the MS-18SK Desert Kampfer "Schildkrote": 


More guns than it can handle, but I use the philosophy of Jayne Cobb.  Start with the biggest gun and work your way down.  Schildkrote translates as turtle.  I thought this very apt because of the nice chunky appearance.  All of the large form shapes are acrylic scoops, spoons and tongs.  Thank you kitchen aisle of the dollar store!


The "radiator" on the back-pack is simply an acrylic honey dripper.  I carefully cut one in half, then quartered it.  There is also the other half under the rear "skirt"; not easy to see in most of the shots.


Any of you long term visitors may be wondering, where are the customary Kinder eggs?  They too are under the rear skirt but not so visible either.  After primary painting and accents, weathering was achieved with good ole pastels.  For the final display base, scenery materials, sculptured foam, and some dried Sedum heads for the sparse foliage.  In hindsight, it probably would have been a good idea to put some figures or vehicles in for scale, which is 1/144 by the way...


This is definitely not the last of the Kobayashi-influenced mobile suits.  As if it isn't enough, there are also the works of other artists such as Kow Yokoyama (SF3D), and Kazuhisa Kondo.  All with their unique styles.  Retirement cannot come quickly enough!

Sunday, April 9, 2017

Bastards from Outer Space #3: "Terran Trade - Alliance?"

Recently I was very lucky at a local second-hand bookshop.  While scanning the many shelves of the sci-fi section and breathing in the aroma of thousands of old musty paperbacks, I happened upon an almost mint copy of "Spacecraft 2000 to 2100 AD", the first in the four book series of the "Terran Trade Authority" handbooks.  They are full of beautiful art tied together with fictional histories.  While carefully reading this gem from 1978, I saw a painting by Bob Layzell on page 53, the "Martian Queen"...


Its bulbous configuration with the outrigger engines was strangely familiar, but I couldn't quite place it, so on to the next page.  The next spacecraft was known as the "Intersellar Queen", and this ship was so impressive it garnered six pages with three paintings, but the one which hit home the most was the page 57 image.


This was by Angus Mckie, another artist I had been quite familiar with, especially with his contributions in "Heavy Metal" magazine.  I had also seen this particular craft in another similar book known as "Mechanismo".  Apparently this ship is known as the 'Hooded Swan', and was used on book covers in the early 70's.  I think because I saw the concepts so close together is what triggered the memory.  Anyone see where this is going?  From the 2002-2003 (cancelled way to soon...) series "Firefly", the ship known as 'Serenity':


I like this shot because of the anti-grav train...  But it should be obvious now.  Outrigger drive engines, a very bulbous stern, and the very bird-like neck and 'head' of the forward section of the ship.  Apparently Joss Whedon was the primary concept designer for the ship, and I have a feeling he had a copy of the art book maybe about the same time I did.


What better 'parents' for yet another iconic spacecraft than from two artists from the Golden Age of British Science Fiction Art!

Saturday, April 1, 2017

The Scrap(book) Shape Spotting Yard - "Project UFO"

Way back in 1978, NBC ran a X-File(ish) series called "Project UFO".  It ran for 26 episodes into 1979.  Produced by Jack Webb (from many a cop show fame...), it concerned two Air Force officers (from Project Blue Book) investigating UFO sightings.  Of course most of the time the end result was the typical explanations of hoaxes, weather balloons and swamp gas, but the final frames gave the final twist of the sighting being genuine.  For the shots of the UFOs, the task went to Brick Price Movie Miniatures, a newly formed effects company (who at the time were constructing the model for the refit Enterprise for the Phase 2 series that never was...)

Early in 1979 I found a magazine called "Special Effects Modeler".  It was published by Price himself and had articles about regular modeling plus the projects they were doing for various productions.  I have never found another issue; I think only one issue was actually printed.  In it was a pictorial feature on the models for the afore mentioned series.  It's a good lesson in modeling on a budget with limited time.  Unfortunately the magazine was in black and white.  So here is the five page spread of various "UFOs of the week".  See how many bits and pieces you can identify!


I left that advert of Brick's company in for historical reasons, but I wouldn't call that number.  I doubt it is in service any more!  Lastly, as a newsman in an Artic outpost once said, "Keep watching the skies..."

Sunday, March 26, 2017

Welcome to the Inner Sanctum

Tonight's post is a "Behind-the-Scenes" feature as to where I do the bulk of my model building.  So let us descend the staircase and follow the dark hallway to the end, where a most imposing door appears.  (Yes, I do work in the basement, but I live with my wife and not my Mum...)


You've gotten this far, but there is no door knocker or door bell.  Fortunately I heard you coming, so enter please....


And this is essentially it.  Yes, I do keep it this neat and organized!  The workbench area is only 10 square feet, and during a project it is crowded with all sorts of tools, a work platform, paints and adhesives, containers of greeblies, nurnies, and shapes, and the omni present rotary tool.  I also have a portable clamp mounted on the bench.  Most of the basic work is done here, but when it is time for large scale cutting and sanding, I do that outside.  The painting is done in a utility room against a large sheet so over-spray is not an issue.

Under the bench is another toolbox, along with 6 bankers boxes full of assorted parts.  The closet to the left out of sight has 7 bankers boxes of more bits and pieces and shapes.  All labelled accordingly of course!  The 20th century tube television on the left does double duty.  Something I found out by accident...  I usually have a film or series running on the TV (connected to a VHS and DVD player) during a project.  I discovered a few years ago that when the TV is on, the screen is of course static and attracts the dust (since its mostly plastic dust anyway).  So my entertainment system is also a dust collector.  I just wipe it down every few days.

So thanks for popping by!  I am currently working on a project which will have three models associated with the theme.  Hopefully be finished by end of April.  Be sure to visit the gift shop on the way out and sign the guest book!

Saturday, March 18, 2017

Shape Spotting #5 - "Good dental hygiene..."

For tonights re-purposed shapes we have "Dr. Bob's Oracare Toothbrush Covers!"  Used to protect the tooth brush when travelling, these nice little shapes are available only at Dollarama in this area.  (There are similar covers available at other dollar stores but this one is the most durable.  It comes in a two pack in several colours; I prefer the clear ones when I can get them....  The dimensions are 1.75" x 1" x .75".


The covers have a hinged lid but I have removed them for both times I incorporated the shapes into a model.  I first used 5 covers in the "Tortoise", a 1/35 mech I did two years ago:


Four for the thruster units, and the other was made to be a missle pod.  Although it is some kind of vinyl I believe, a little sanding to remove the gloss and I have no trouble glueing or painting them with standard off the shelf products.  There is also a small hole at the narrow end, I guess for ventilation...  More recently I used 6 more on the Gibraltar:


A little difficult to see under all the other greeblies and nurnies!  They made nice modules and again I had no trouble in glueing them to other materials.  I have future plans to use them as cargo pods in larger numbers on ships or maybe railroad cars.  To look at them as pictured above, you could easily ad a handle, two little wheels, and a city logo.  Now you have a garbage or recycling cart!  Always look beyond the items intended purpose!

Saturday, March 11, 2017

The Scrap(book) Yard #4 "When Puppets Attack!"

Tonights little TV Guide snippet is from an ABC TV movie from 1975.  The film "Trilogy of Terror", was first broadcast on March 4 of that year (should have posted this last week for the 42nd anniversary!) and was basically a Twilight Zone-ish/Night Gallery-ish anthology with Karen Black playing four different roles in the three segments.  In the final chapter, "Amelia", Karen has bought her anthropology-professor boyfriend a "Zuni Fetish Doll", a rather ugly little bastard only 12 inches tall.  The doll has a necklace which, when it accidentally breaks and falls off lets the demon within bring the doll to life.


The rest of the film has Karen running and screaming about her apartment in a bathrobe being relentlessly chased and attacked by the persistent Pinocchio.  All practical in camera effects and hands on puppetry.  Eventually she traps the murderous doll in the kitchen oven where it catches fire and burns up.  It's never good to be a wooden actor....

Sunday, March 5, 2017

Bastards from Outer Space

How many times have you been watching a SF film or television series, and suddenly realized, "Hey, they ripped that (ship, vehicle, alien, structure, etc) from that other (SF film-TV show)!"  And so begins another little feature I have had in the back of mind for some time now.  I realize in this day and age, where so much has been written, drawn, or filmed, there is bound to be conscious or unconscious influences when it comes to production design.  Now to be fair, SF films have been around for over 100 years, so there is alot of material out there!  In some cases, the "doppelgangers" may be intentional, as a hommage or Easter egg.   Perhaps the director has specifically asked for "something which looks like that other thing..."   Either way, there are many examples available.  For the premiere post, I have a flying machine which falls into the category I like to call, "Cosmic Combinations".


Back in 1994, there was a Gerry Anderson live-action series called "Space Precinct".  Basically an SF cop show set on the planet Altor in the year 2040.  Familiar storylines but, the thin blue line has to deal with all sorts of bizarre crimes as well as many alien species.  There was no shortage of miniature effects either.  In the episode "Deadline", the baddies are illegally harvesting organs (both human and alien) for high paying clients.  Their base is this giant floating billboard which cruises over the city with bright lights advertising and noise.  Sound or look familiar...?


Who else could the father be but the advertising blimp from 1982's "Blade Runner"!  I could go on for hours about this film!  I've been freaked out since I saw this film on opening night!  The influences and inspirations are still strong today, (but don't get me started about this sequel!).  But the blimp is a thing of beauty.  Check out the web for many images of the blimp studio model and it's construction.  But the shape is still wrong.  I think the mother could be:


From the 1984 film "Dune".  Alot has been said about Lynch's adaption, but not today.  I am more interested in the miniature effects for the film, and this wedgie is a Carry-All, a huge flying brick which transports spice harvesters on the planet Arrakis.  So there you have it; the "Space Precinct" blimp even has the outriggers on it!  I like to think of this little "love child" as a hommage.  But as in all Anderson productions, most models do not have a happy ending...


To bad for anyone with a penthouse suite in this town!

Saturday, February 25, 2017

Shape Spotting #4 "....it shows them pearly white"

Trying to find that perfect little round shape can be a pain, especially since you usually don't get alot of them in a model kit, and are forced to find other sources.  When in doubt, a trip to the dollar store will solve the problem.  Just head down the craft aisle....

On one of my many quests, I came upon these.  White Pearl Halves, made of a hard plastic and with a thin foam glue pad on the back.  Sold on a card, these little domes can range from a diameter of 3mm to 12mm, depending on the manufacturer and store.  


They are great for subtle details, mini-domes, and even lenses.  I have used them extensively since finding them a few years ago.  All you have to do is remove the foam backing and glue with standard plastic cements.  Examples follow:


I needed alot of convex shapes to make lense clusters and sensors for the Hunter-Killer machine.


The lense for the Tortoise's headlamp is made up of a pearl plus other cylindrical parts.


The Buzzard has about two dozen of the half pearls in various sizes all over the hulls and payload.


And finally some domes on the Gibraltar.  These little "gems" are priceless when it comes to needing large amounts of curved mini shapes.  Of course these craft supplies are not just limited to the pearls.  I have seen many other types such as rhinestones, diamonds, and other faceted shapes.  Don't be afraid to buy them; just tell the clerk they are for your wife, girlfriend, or daughter..... 

Saturday, February 18, 2017

The Scrap(book) Yard #3 "Post-Apocolyptic Pilot"

Tonights post is hardly a miniature, but it does fall into the catagory of in-camera effects and props.  After the fall of "Star Trek", Gene Roddenberry tried several times to create new series in the sci-fi vein.  One of these was called "Genesis II", and aired way back in 1973 as a 90 minute TV movie on CBS.  (My first viewing of this film was on a BxW television trying to get a decent signal by antennae from Buffalo, NY!).  I won't go into too much detail here; there is enough out there on the internet if you want to pursue it further... ( It is probably availabe to watch on YouTube).   Basically a scientist named Dylan Hunt (played by Alex Cord) gets trapped in suspended animation after an earthquake seals off his chamber in a scientific research facility in the Carlsbad Caverns.  Fast forward to the year 2133, the now inhabitants of this complex find the chamber and revive him.  What follows is his many adventures in the new world, after the "Great Conflict" along with several "Star Trek" alumni.  The travel gimmick in this film is not a starship, but an underground, nuclear-powered "sub-shuttle", a combination of miniature effects and the full-size prop.  Here is a little feature that appeared in the March 1973 issue of TV Guide:


Our protaganists would use this device to travel all over the world to bring peace and friendship to other post-apocolyptic societies.  As with "Star Trek", a second pilot film was made called "Planet Earth",  but this 1974 offering has John Saxon replacing Alex Cord and again more Trek actors.  Apparently I have found evidence that CBS had optioned six episodes as a mid season limited series; Roddenberry had 20 intitial story outlines.  But as more often than not, the show never made it past the two pilot films.   But a few decades later, many of the plot elements got reused for the Kevin Sorbo series "Andromeda", about a starship's captain called Dylan Hunt (?), who after being trapped on the event horizon of a black hole for 300 years awakens to find his society gone and begins a quest to restore peace to the galaxy....  Oh do I miss the '70's.....

Saturday, February 11, 2017

Shape Spotting #3: "Dead Dremel Dilemma"

My dayjob is real modelling, and in the workshop we eat Dremels for breakfast.  It is one of our staple tools; used, re-used, and abused.  It is no wonder that the poor things will eventually wear out, through motor faliure, bent shafts and other misc fates. The unsaveable end up in the bin; this is where I come in!


The primary model used is the Dremel 200.  It is durable and basic without the newer model flash contours and colours, plus the ergonomic hand grips.  Once you take the guts out, you are left with a nice sturdy housing already with vents and other access points.  The labels are easy to remove and if you look closely at the black plastic shell, there is a bonus texture pattern!  I have only used this shape twice in previous projects:


I used the first as the main gun on the Martian tank "Herbert George" (see post from March 16, 2014 for the full back story).


And more recently as the secondary hull on the "Gibraltar", although it is difficult to see through all the greeblies.  Again the vents add to the texture of the shape, plus there is a half-inch diameter hole through the tool housing which was perfect for the mounting rod.

This of course applies to all tools, not just a Dremel.  Everyone at some point has had broken tools which end up in the rubbish.  I say remove the innards and keep the shell.  At this time, I am now down to only one shell remaining in the shapes box, so guys, let's start breaking some more tools!

Sunday, February 5, 2017

The Scrap(book) Yard #2 "The Saga of Space:1999"

Well, not exactly...  But "back in the day", before the internet, before this instantaneous exchange of information, we had to wait patiently for tidbits and bread crumbs concerning any new films or TV shows.  Besides  Famous Monsters and The Monster Times, there were very few sources in the early and mid seventies.  So when other magazines would feature an article, especially about a new Gerry Anderson production called "Space: 1999", these little gems would be readily purchased without a second thought.  Such was way back in February of 1976 (41 years ago?!), I spotted an issue of a Man's magazine called Saga which had a photo of an Eagle on the front cover.  ($0.75 suddenly gone; there went my allowance!).

Saga was an offshoot of a popular UFO magazine from the same publishers I believe.  Mostly newsprint pages with a few glossy pages inserted for the "special" features.  (I have no idea how long the magazine was in print, but I don't think it was printed past the 1980's.... )  Also lots of adverts on new careers like radio repairmen, draughtsmen, locksmiths, & automotive customization, as well as ways to increase your muscles and attract lots of women!  (I'll put a disclaimer in here for Gambi Publications, the publisher of this American magazine, if anyone is still out there..?).  But I was more interested in this centerfold:


The show had been on the air for five months now, but (the horror of it all...), we only had a B & W television!  So full colour photos are like gold!  Never was Moonbase Alpha so clear, and the landing pads are red!!!  But turn the page...


So much colour!  I can't remember if "The Last Enemy" had even aired yet!  But the series went on; many reruns and eventually, before the first season ended, I managed to purchase a colour television.  (You want something you go out and get a job!).  So it was back to FM and TMT for news; there were rumours of a second season, but it was not confirmed until I found the October 1976 issue of Saga with yet another colour centerfold (now remember most magazines are released a few weeks ahead of the published date, so the new season was yet to air...).  The cover price was raised to $1.00, but now I had a job!


New ships; new characters...  What's going on?  Guess I will have to turn the page...


Wait...  What...?  Only three pictures this time, and one is the same shot of Alpha just slightly cropped.  Guess this was a portent of things to come.  Unfortunately I never saw much of the second season of "Space: 1999" in its first run on television.  The time slot was such that I was at work (it was aired on Saturday afternoon) so by the time I was home it was over.  I did manage to see some other episodes on the French channel, but that was about it.  Thank the Maker for DVD box sets!  As for other information sources, I acquired my first issue of a new sci-fi magazine called Starlog a few weeks later (it was already the second issue).  I was content!


Saturday, January 28, 2017

Welcome Back Commander....

For tonights post I would like to revisit a small project I did a few years ago.  Rather than the "traditional" modelling with kitbashing and assorted shapes, I decided to first, build the model on a computer, and then have it created in a Stereo Lithography machine (resin not 3D printing).  As another of my hobbies are RTS computer games (which back then took up way too much time...), I selected a vehicle from the game "Tiberian Sun".

Released in 1999 by Westwood Studios (closed in 2003 by EA), it was the sequel to the original "Command and Conquer".  Other popular titles were the "Red Alert" series and they also took the format to Arrakis in "Dune 2000".  The storyline was basically fighting the baddies with various machinery, base building, micro-management and assorted missions.  Another distinct feature of the Westwood games was the use of FMV cutscenes before and after the missions, which included well known genre actors like James Earl Jones and Michael Beihn.  (Sometimes I just liked to watch the "movies"!).  It is still played today, and you can research it yourself if you so choose.

The vehicle I chose to model was the Hover MRLS (Multiple Rocket Launcher System) from the good guys, the Global Defence Initiative (GDI).  It had clean lines so was fairly easy to model.  I started by first drawing up some basic plans in AutoCAD, using images and references I gleaned from the good old internet.  I then exported the drawings into a 3D program called "Solidworks" and modelled it from there.


From the "model" it was then off to the resin goo where the replica is created by a lazer which cooks the polymer a few fractional millimeters at a time.  Even a small model like this may take several hours to create.  Once completed, the model is removed from a steel tray, and goes through a cleaning process involving several chemicals and a final curing in a UV oven.  Unfortunately I did not take any photographs of the "birthing" when it emerged from the soup.  One drawback with this process is the support material necessary during the build process.  This fine web has to be removed carefully and then there are usually minor repairs, especially around delicate areas.  The end result:


The MRLS is 4.5" in reality; I calculated the scale to be approximately 1/72, based on the images I used).  (I also made an 1/87 model in Solidworks for use in a model railroad at some future date; still waiting....).  No real special modelling techniques this time, just the basics.


Enamel military colours with pastels for weathering, and the GDI logos are custom decals.


The scenery was made using dried Sedum flower heads.  They grow like weeds in our garden, so I get alot of free trees!  I just leave them over winter and let nature freeze-dry the plants.  I then harvest what I need in spring.  You can cut and combine to make whatever shape you want.  I then use acyrilic paint on the seed head and dip them in scenery flocking.  Various shades of green bring them out nicely, even at this scale.  The rocks are just carved foam, and the "Tiberium" crystals are made from broken glass beads.


One thing evident is the complete lack of the Kinder Egg, but it won't happen again!  I couldn't figure it into the scenario, and besides, this was not my usual way of modelling.  Now I feel it may be time to dust off that CD-ROM case and go save the war-torn world of 2030 yet again!

Sunday, January 22, 2017

The Scrap(book) Yard #1

New look; new format!  I had originally intended this blog to be a platform to showcase the models and miniatures I construct.  But there are many other things to say and/or contribute, so today I am starting with a new ongoing feature.  Over the years I have collected many articles from magazines and other print sources which deal with miniature and model work, as well as practical in camera effects and props.  (I apologize in advance for the quality of some of the images.  That paste I used so many years ago was not "time friendly"!)  My first post was taken from TV Guide magazine way back in 1975.  (Is this still copyrighted by TV Guide; I have no idea,  but I shall acknowledge the source just to be sure...).


The October 11, 1975 issue featured an article on some model work for the Sid and Marty Krofft series, "Far Out Space Nuts".  Lasting only 15 episodes, this Saturday morning live action series starred Bob Denver and Chuck McCann.  (I will let you research the series further if you so wish; the episodes are available on YouTube...).   The amazing fact of this clipping is the model builder is non other than Mike Minor!  If you follow Star Trek, you should be very familiar with this man.  (Again I invite you to look further into Mr. Minor's history....).  Nice to see good old simple effects, as well as the use of dried teazel flowers for use as alien vegetation!   Until next time: "Think big, but build small!"

Saturday, January 14, 2017

Shape Spotting 2: "The Origin"

I have often wondered as to where this modeling style of mine began.  Of course my father was a big modeler (and encouraged my interest in the craft), as well as watching films and TV, usually with many miniature effects.  Of course the Gerry Anderson productions take the lead, but not all the vehicles were readily available as kits, plus there was a considerable lack of reference materials available.  It was the Dark Ages; there was no internet!  Fortunately I received the 1966 Thunderbirds annual (City Magazines Ltd. & A.P. Films Merchandising Ltd., if these companies still exist!), which was full of technical illustrations and photos.  But in all these 94 pages of Supermarionation goodness, two stand out.  It is the feature "How to Make a Lunar Landscape".  Here is page 52...


I of course immediately started to scrounge for all the materials required.  Following the directions carefully, I built the diorama display base and used it for what space toys and models I had at the time (as the Moon was quite popular back then what with the space race and all...).  But the real inspiration came from page 53...


An allowance can go only so far, but now I had been given the means to "expand the fleet" basically for free!  I built them all as shown, and expanded on the concept further.  Using whatever bits and pieces I could find that were not kept in a secure place, I constructed many ships and space machines.  (And to make matters even more challenging, the Kinder Eggs are still twenty years away!)  Some met many "unfortunate situations"; after all this was an Anderson-inspired diorama and something has to blow up every episode!  So, try it yourself!  Go back 51 years and do some modeling like we had to do back in the 20th century before all the fancy materials we now take for granted didn't even exist!

Sunday, January 8, 2017

Shape-Spotting: "I am the Egg Man"

This first post of 2017 is also the first in a series where I show some of the unique non-model kit related shapes I collect and hoard.  The first is the most used item which has become a sort of tradition over the years.  At least one example of this shape is in every model I have made in the past several years.  They are, of course, the Kinder Surprise eggs.


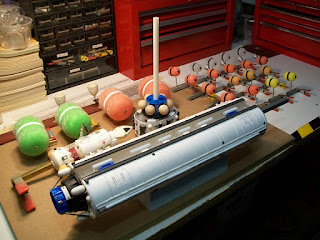
I first became aware of these eggs/plastic capsules when I began dating my wife.  The family tradition was to have an egg at Christmas Eve (usually in the stockings), and then another one at Easter.  I saw many possibilities with these eggs and also with the toy surprise inside.  So it was at this point the collecting began.  Made of soft plastic (not an acrylic or styrene), they can be glued with epoxies or similar glues, and take paint after mild sanding.  At the beginning, it was primarily the small (4.4cm x 3cm D) eggs, but later on, the larger (10.8cm x 7.5 D) eggs were available.  It wasn't until recently I discovered a third medium size capsule (7.6cm x 5.7 D) when I was given a donation of eggs from a co-worker (thnx Erika!) to help replenish my exhausted supply from a recent project (see previous posts).  The eggs can represent anything from fuel or other chemical tanks, gas or liquid, flotation devices and other similar containers.  I have used them as "ammo boxes" on a early (unpublished) Gunpla work here:


Fuel tanks on the Cargo Barge Regina:


And the epic amount of 24 assorted sizes on the Buzzard:


The one little annoyance with the capsules is the seam.  You can glue them and if you so want, spend time sanding and filling the gap with putty.  I like to use a band of very thin styrene or 1/4" border tape to hide the seam.  Unfortunately, several years ago the capsule design changed from the separate halves to a single hinged egg with a dimple for opening the egg.  I am not a fan of this configuration, preferring the "classic" look.  At least the medium and large sizes are still of the same construction.

But then, about a year ago, I noticed another eggy chocolate/toy in a clearance bin at a local grocery store.  I purchased one, and to my surprise, this egg was better!  I went back to that store the next day and bought a dozen more.  I had found the Zaini Egg:


Still made of a soft plastic, these little gems are 4.4cm long with a diameter of 3cm.  The ends are chamfered with a blunt end, and there is actually a base (1.2cm wide) where the hinge for the capsule is.  The same glues can be used as on the Kinders and again the seam can be puttied or covered by a thin strip.  My most recent project, the "Gibraltar" is the first time I have incorporated them into a model (the "fuselage" has been omitted for clarity):


Six Zaini's and only two Kinder Eggs this time...  The Zaini's are clear plastic, while Kinders are mostly coloured and opaque.  The Zaini's mount easier, because of the flat base, but the Kinders have to be secured some way with a bracket or brace.  Then its a good coat of paint, maybe some decals and then a bit of shading.  Both capsules have their merrits and work well!  Now if Zaini only had a jumbo version....